Creating and Trusting Self-Signed Certs on MacOS and Chrome
In this post, I'll explain how to create a self-signed certificate configure Chrome on your macOS to trust it for local development.
A few years ago I write a post Set up Self-Signed Certificates & Trusting them on OS X. I use Chrome as my primary browser which had a few changes both to the way it handles SSL certs. Since I know I’ll have to do this again in the future, I’m updating the post to reflect those changes if for no other reason, so I have something to go back to in the future.
There are two parts to this process:
- creating the self-signed cert
- adding the self-signed cert to the machine’s Trusted Root Authority
Workarounds
There are two workarounds you can leverage to avoid these issues… but use them at your own risk. I would skip this section and just do it the right way. They are listed here for information only.
Temporary Workaround
There is a temporary workaround. Until Chrome 65, you can configure Chrome to respect the old commonName behavior with the EnableCommonNameFallbackForLocalAnchors setting.
On Windows, add the following registry key
1reg add HKLM\Software\Policies\Google\Chrome /v EnableCommonNameFallbackForLocalAnchors /t REG_DWORD /d 1
On MacOS, run the following:
1defaults write com.google.Chrome EnableCommonNameFallbackForLocalAnchors -bool true
Dangerous Workaround
Another option is to simply launch Chrome and instruct it to ignore all certificate warnings. Launch Chrome with the --ignore-certificate-errors argument.
This works when you work with your self-signed certs, but you should never browse the web in this mode.
Creating the Self-Signed Cert
Last time I did this, I used the openssl utility. It wasn’t too hard, but one thing that changed is how Chrome respects certificates.
As of Chrome 58, you can’t just identify the host using the commonName property. You must now also include the host in the subjectAltName property as well. The trick is you can’t specify the subjectAltName property using just the command line openssl tool.
Instead you must use a configuration file. What I did was take the default openssl configuration file on my machine, copy it and make a few edits. Here’s what the final one looks like:
 1[ req ]
 2default_bits        = 2048
 3default_keyfile     = server-key.pem
 4distinguished_name  = subject
 5req_extensions      = req_ext
 6x509_extensions     = x509_ext
 7string_mask         = utf8only
 8
 9# The Subject DN can be formed using X501 or RFC 4514 (see RFC 4519 for a description).
10#   Its sort of a mashup. For example, RFC 4514 does not provide emailAddress.
11[ subject ]
12countryName         = Country Name (2 letter code)
13countryName_default = US
14
15stateOrProvinceName         = State or Province Name (full name)
16stateOrProvinceName_default = FL
17
18localityName          = Locality Name (eg, city)
19localityName_default  = Florida
20
21organizationName         = Organization Name (eg, company)
22organizationName_default = Andrew Connell Inc.
23
24# Use a friendly name here because its presented to the user. The server's DNS
25#   names are placed in Subject Alternate Names. Plus, DNS names here is deprecated
26#   by both IETF and CA/Browser Forums. If you place a DNS name here, then you
27#   must include the DNS name in the SAN too (otherwise, Chrome and others that
28#   strictly follow the CA/Browser Baseline Requirements will fail).
29commonName          = Common Name (e.g. server FQDN or YOUR name)
30commonName_default  = localhost
31
32emailAddress         = Email Address
33emailAddress_default = brickwall@andrewconnell.com
34
35# Section x509_ext is used when generating a self-signed certificate. I.e., openssl req -x509 ...
36[ x509_ext ]
37
38subjectKeyIdentifier    = hash
39authorityKeyIdentifier  = keyid,issuer
40
41# You only need digitalSignature below. *If* you don't allow
42#   RSA Key transport (i.e., you use ephemeral cipher suites), then
43#   omit keyEncipherment because that's key transport.
44basicConstraints  = CA:FALSE
45keyUsage          = digitalSignature, keyEncipherment
46subjectAltName    = @alternate_names
47nsComment         = "OpenSSL Generated Certificate"
48
49# RFC 5280, Section 4.2.1.12 makes EKU optional
50#   CA/Browser Baseline Requirements, Appendix (B)(3)(G) makes me confused
51#   In either case, you probably only need serverAuth.
52# extendedKeyUsage  = serverAuth, clientAuth
53
54# Section req_ext is used when generating a certificate signing request. I.e., openssl req ...
55[ req_ext ]
56
57subjectKeyIdentifier        = hash
58
59basicConstraints    = CA:FALSE
60keyUsage            = digitalSignature, keyEncipherment
61subjectAltName      = @alternate_names
62nsComment           = "OpenSSL Generated Certificate"
63
64# RFC 5280, Section 4.2.1.12 makes EKU optional
65#   CA/Browser Baseline Requirements, Appendix (B)(3)(G) makes me confused
66#   In either case, you probably only need serverAuth.
67# extendedKeyUsage  = serverAuth, clientAuth
68
69[ alternate_names ]
70
71DNS.1       = localhost
72DNS.2       = localhost.localdomain
73DNS.3       = 127.0.0.1
74
75# DNS.1       = example.com
76# DNS.2       = www.example.com
77# DNS.3       = mail.example.com
78# DNS.4       = ftp.example.com
79
80# Add these if you need them. But usually you don't want them or
81#   need them in production. You may need them for development.
82# DNS.5       = localhost
83# DNS.6       = localhost.localdomain
84# DNS.7       = 127.0.0.1
85
86# IPv6 localhost
87# DNS.8     = ::1
The things to note are:
- lines 69-73: I specify the alternate URLs I want the cert to be registered for… in this case localhost
- line 61: the alternate URLs are used in the
subjectAltNameproperty for the cert.
With the config file set up, now you can create the certificate. Run the following command:
1openssl req \
2  -config openssl.conf \
3  -new -x509 -sha256 \
4  -newkey rsa:2048 \
5  -nodes \
6  -days 1000 \
7  -keyout localhost.andrewconnell.key.pem \
8  -out localhost.andrewconnell.cert.pem
What are all these properties?
- req: PKCS#10 certificate request and certificate generating utility
- config: The configuration file to use.
- new x590 sha256: Create a new key and output a self signed certificate instead of a certificate request; this is typically used to generate a test certificate or a self signed root CA.
- newkey: This option creates a new certificate request and a new private key. The argument takes one of several forms. rsa:nbits, where nbits is the number of bits, generates an RSA key nbits in size.
- nodes: If this option is specified then if a private key is created it will not be encrypted.
- days: When the -x509 option is being used this specifies the number of days to certify the certificate for. The default is 30 days.
- keyout: This gives the filename to write the newly created private key to.
- out: This specifies the output filename to write to or standard output by default.
At this point you’ve got the key and associated certificate created with the desired subjectAltName property.
Add Certificate to Trusted Root Authority
When browsing a site with a self-signed cert, you will likely see something like this in the Chrome address bar:

Chrome & Insecure Certificate
This indicates there’s an issue with the certificate. Typically this is because the cert is not trusted by the computer. What you need to do is add it to the machine’s Trusted Root Authority.
Within Chrome, do the following:
Developer Tools » Security tab
Click the View Certificate button to see the certificate:
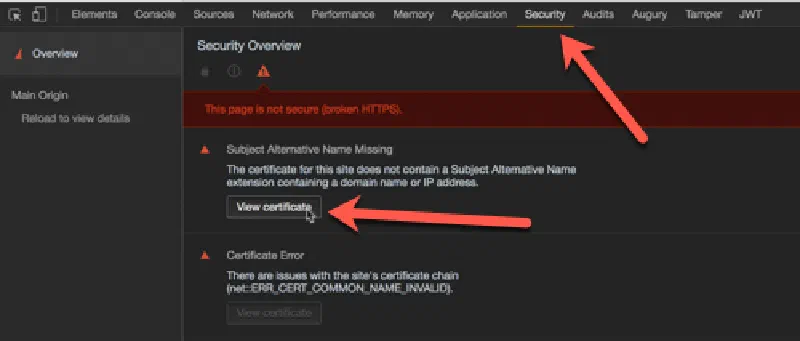
Chrome > Developer Tools > Security Tab > View Certificate
Click and drag the image to your desktop. It looks like a little certificate.
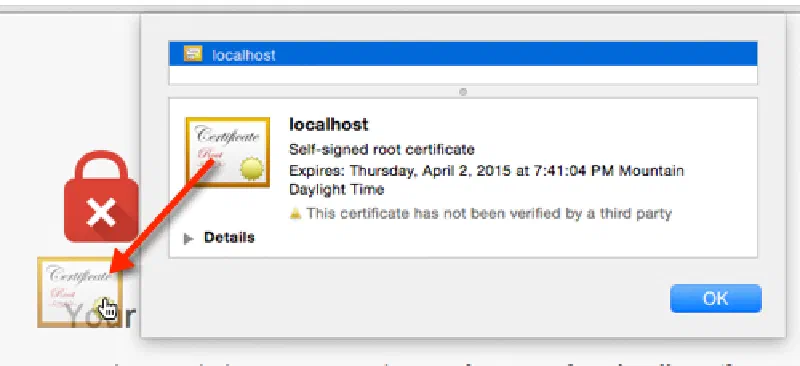
Exporting the certificate
Open the Keychain Access utility in OS X.
Select the System option on the left.
Click the lock icon in the upper-left corner to enable changes.
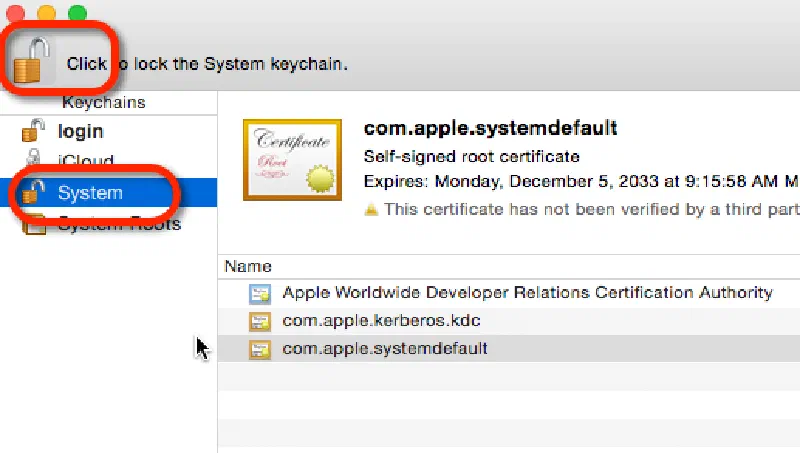
Keychain > System
In the lower left, select the Certificates option.
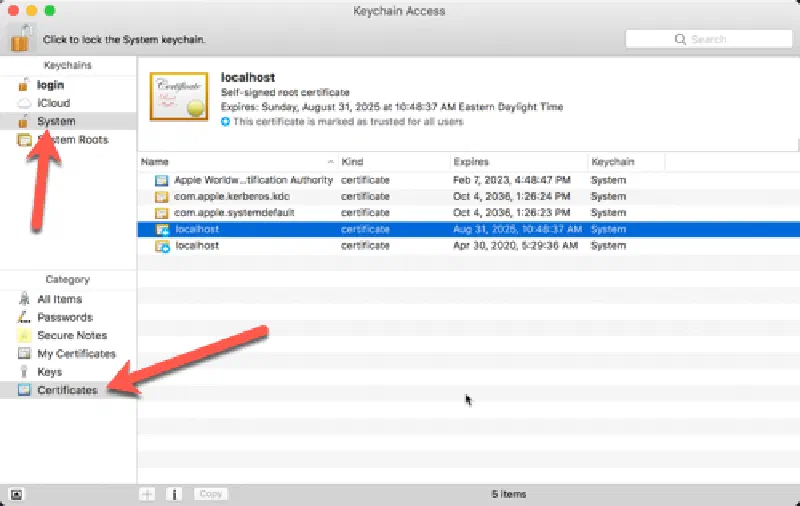
Keychain Certificates
Drag the certificate you copied to the desktop into the list of certificates.
After localhost gets added to the System keychain, double-click it to open it again.
Expand the Trust section and for the first option, pick Always Trust.
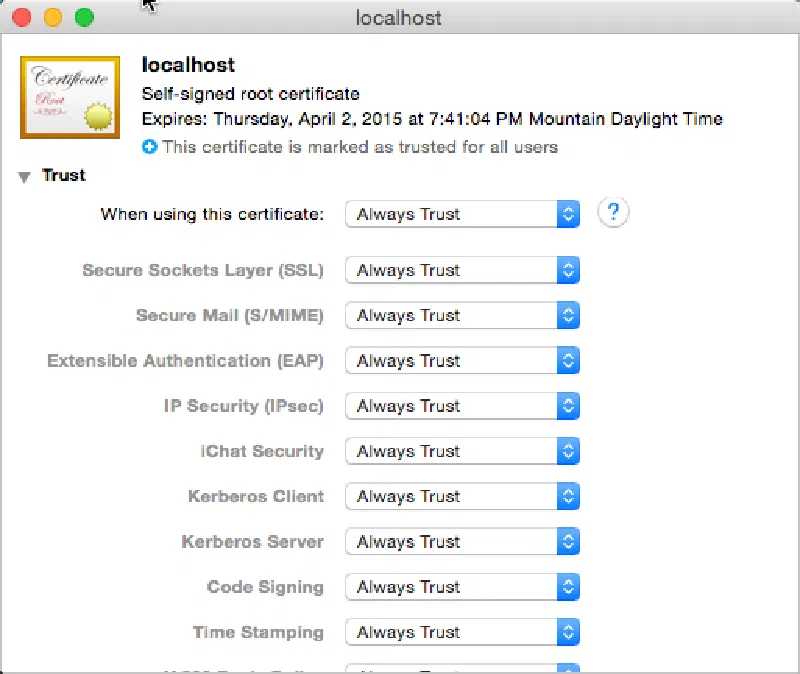
Trusting Certificates


At this point everything has been configured. Quick Chrome and all other browsers and try again to navigate to the local HTTPS site. The browser should report it as a valid certificate:

Chrome & Trusted Certificate View
At this point you now have a self-signed certificate installed on your machine.