A few months ago I re-launched my site on Hugo. At that time, my goal was simply to get off my own platform and onto Hugo. This was quickly followed up by automating my deployments with Azure Pipelines. I wasn’t finished, there were a few more things I wanted to add, including search. That’s what this post is about (and the next few). I’ll show you how I added search to the site using Azure Search, and all using the 100% free tier!
I’m going to break this topic up into three posts. This first post is how to add search to your site using Azure Search. I’ll cover the Hugo configuration, creating the Azure Search instance & the user interface for the search page.
The second post will cover how to monitor the search experience on your site. You want to see what people are searching for what they click on in the results. For this, I’ll show you how to leverage Azure Application Insights for this.
Azure Search can reindex your site if you tell it when content has been added, updated or deleted. That’s fine for a dynamic site, but for a static site, it’s really not necessary. My site is over 2,700 content pages. The complete index is under 10MB and can be indexed in under 1 second, so why deal with the changes? It’s easier to just reindex it. In the third post, I’ll show you how I configured my Azure Pipeline to trigger Azure Search to reindex the site whenever the site is rebuilt.
Sound good? Cool… let’s get started.
Step 1: Configure Hugo to build an index feed
The first thing to do is to create a data extract of the content on your site that Azure Search can index. Do this by creating a new output format in your site config file config.yml. I’ve named my output format json and configured it as follows:
outputFormats:
  json:
    mediaType: "application/json"
    baseName: "feed"
    path: "azureindex"
    isPlainText: true
This will create a new folder /azureindex on my site and add a file feed.json that is plain text but the media type is application/json. To use this, I add add the output format to the home output:
outputs:
  home:
    - HTML
    - json
In addition to the home page rendering HTML, it will now render this JSON file out.
Next, give Hugo a template file to know how to generate the file. Add a new home.json file to your theme. My theme is named ac, so the path looks like ./themes/ac/layouts/_default/home.json in my site codebase.
Add the following to it. This will create a JSON array filled with every content page in the site. The code should be easy enough to read:
[
  {{- range $index, $e := .Site.RegularPages }}
  {{- if $index }},{{- end }}
  {
    "url": {{ .Permalink | jsonify }},
    "title": {{ .Title | jsonify }},
    "date_published": {{ .Date.Format "2006-01-02T15:04:05Z07:00" | jsonify }},
    "date_published_display": {{ .Date.Format "Monday, January 2, 2006 3:04 PM" | jsonify }},
    "description": {{ .Summary | plainify | jsonify }},
    "content": {{ .Plain | jsonify }},
    "tags": {{ .Params.tags | jsonify }}
  }
  {{- end }}
]
There’s one property I want to call out. The date_published_display is the date, but it’s rendered the way I want it displayed in the results. While I could convert the data on the page with a JavaScript library, there’s no need to add that complexity and adding another field to the index won’t make much of an impact. Plus, the Go syntax for converting dates is so simple.
That’s it… with this done, we’re ready to move onto Azure and create the Azure Search resource.
Step 2: Create the Azure Search resource
Within the Azure Portal, create a new Azure Search resource:
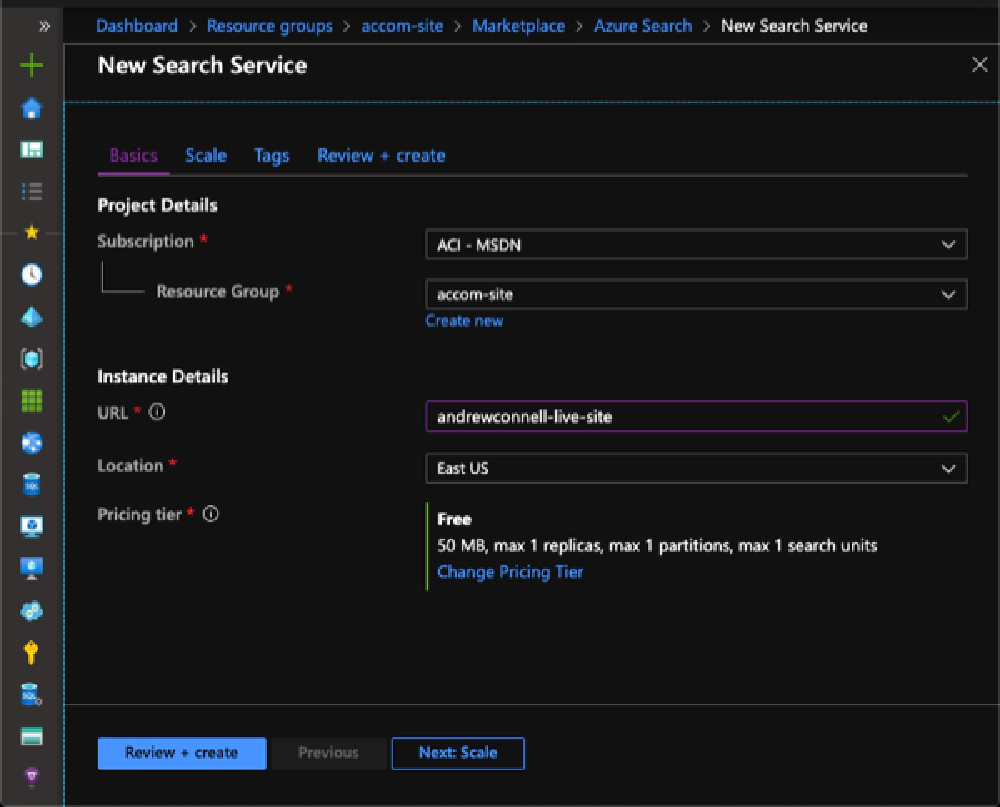
Create new Azure Search resource
Everything here is basically the default options. The only non-default option I chose is using the free pricing tier.
Once the resource is created, the first step is to create a data source. In the top navigation of the resource, select Import Data. The important fields to set are:
- Data Source: Azure Blob Storage
- Data to extract: Content and metadata
- Parsing mode: JSON array
- Connection string: select the blob storage container where your site is deployed
- Blob folder: the value of the
pathproperty of your Hugo configurationoutputFormats / json
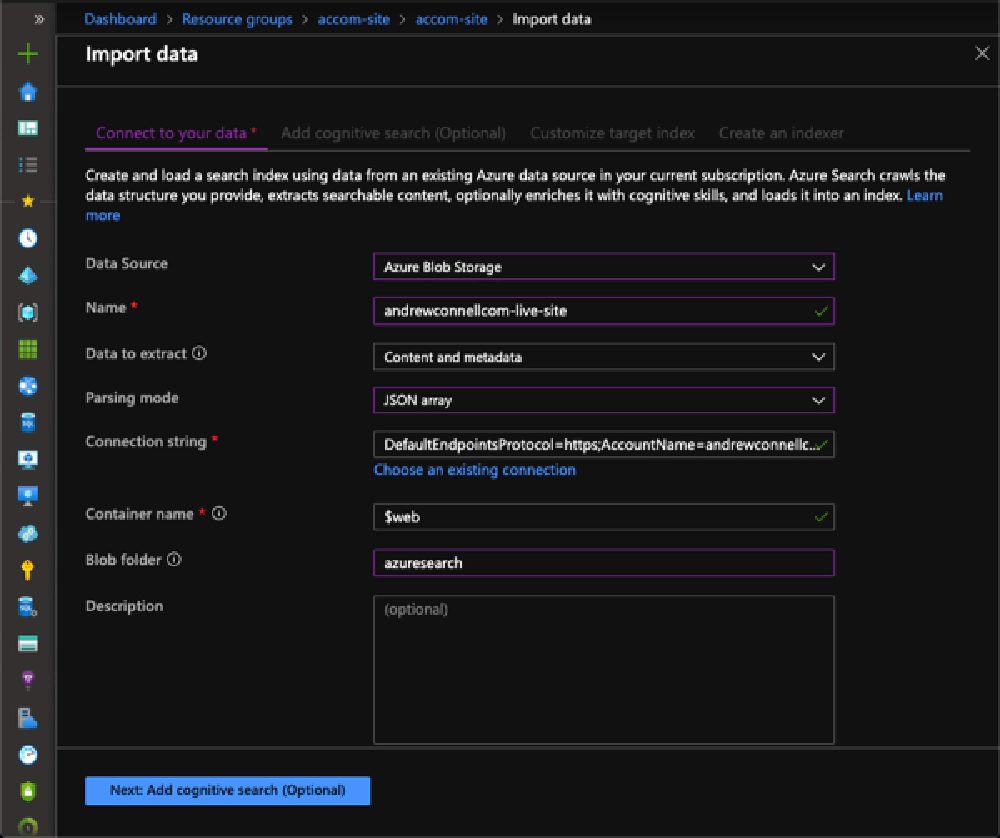
Importing data into Azure Search resource
I skipped the optional Add cognitive search step and went straight to the Customize target index.
Now you need to define the index. If you don’t get this right, you have to start again. I’m going to let you read the Azure Search docs on creating an index for what each of these terms means and instead skip to the important parts:
- Set every property to retrieveable, except for the
date_published&contentfields; those don’t need to be displayed in the results. - Set the
date_published_displayproperty to be a string. - Select the options filterable, sortable, facetable, and searchable on the
title,date_published&tagsfields. - Select only the searchable option on the
contentfield. - For all fields that have an Analyzer option, I used the English - Microsoft analyzer which seems to work great.
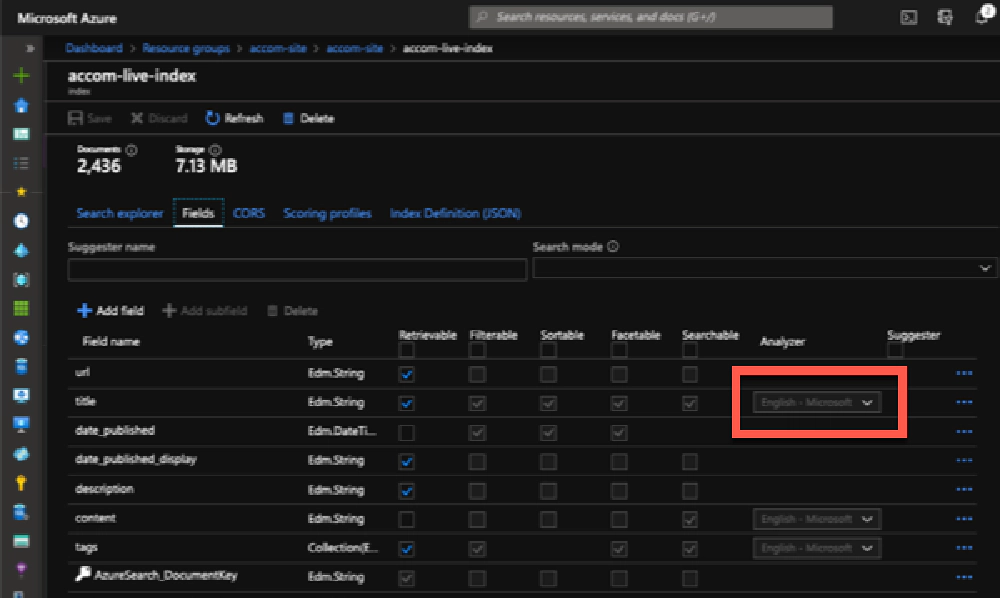
Create Search Index
I also customized my index by creating a custom scoring profile following the guidance Waldek Mastykarz defined in his post Optimize Azure Search for blog.
Specifically, I set the following field weights when a query is executed:
- title: 5
- tags: 3
- content: 1
I also set the following function up to favor more recent content in the results:
- Function type: Freshness
- Field name: date_published(Edm.DateTimeOffset)
- Interpolation: Quadratic
- Boost: 3
- Boosting duration: P365D
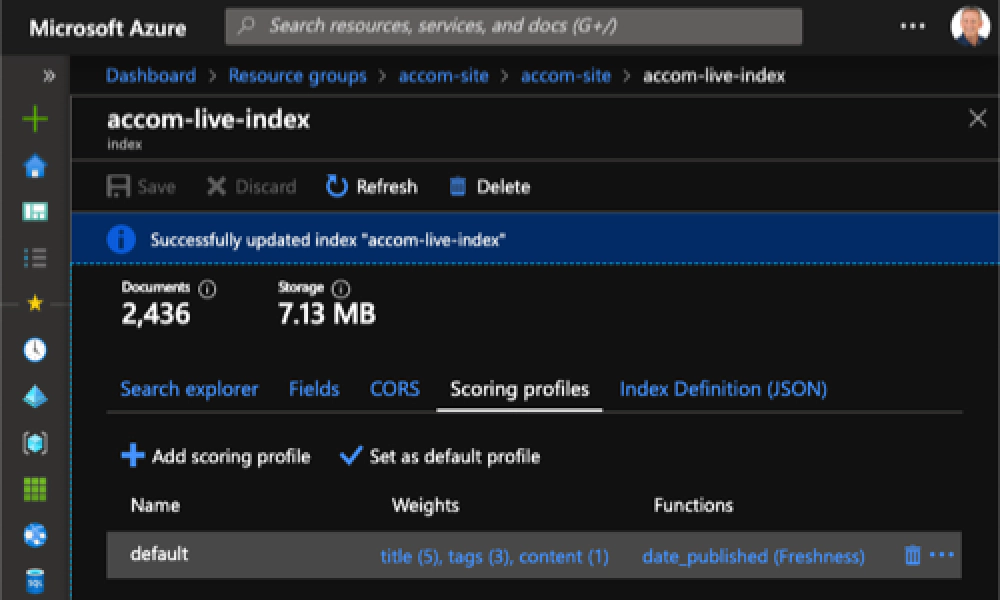
Create Search Index Scoring Profile
And that’s it! While you’re here, make sure you grab the following settings, as you’ll need these values in the next step:
- Search instance name: accom-site in the following screenshot
- Search index name: accom-live-indexer in the following screenshot
- Query key: select the Keys menu and create a query key. Make sure you don’t grab an admin key by mistake!
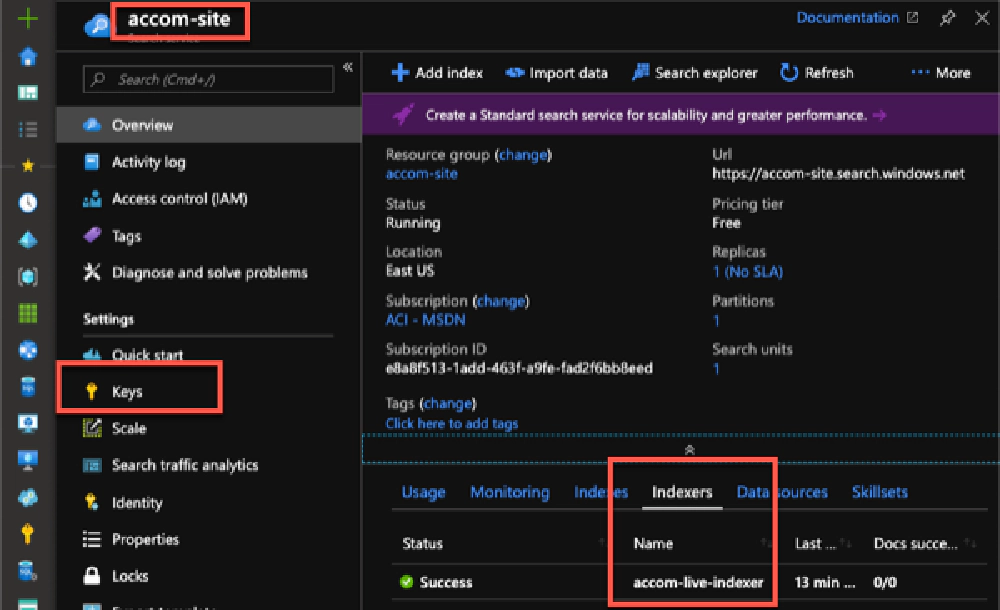
Azure Search instance details
With Azure Search configured, the last step is to implement the user experience on the site!
Step 3: Implement the search user experience
The last step is to add the user experience to the site.
First, create a form where people can submit a search query. I added this as a form in the menu. On submit, it submits the query on as a query string parameter to the search page:
<script>
  (function(){
    Mustache.tags = [ '[[', ']]', ];
    var template = document.getElementById("search-results-template").innerHTML;
    Mustache.parse(template);

    var query = getUrlParameter('search');
    var azSearchInstance = '{{ .Site.Params.azureSearchInstance }}';
    var azSearchIndex = '{{ .Site.Params.azureSearchIndex }}';
    var azApiKey = '{{ .Site.Params.azureSearchApiKey }}';
    var azSearchResults = '{{ .Site.Params.azureSearchResults }}';
    var encodedQuery = encodeURIComponent(query);

    $.ajax({
      url: 'https://' + azSearchInstance + '.search.windows.net/indexes/'
          + azSearchIndex + '/docs?api-version=2019-05-06&$top=' + azSearchResults
          + '&api-key=' + azApiKey + '&search=' + encodedQuery,
      method: 'GET'
    }).done(function (data) {
      // display results
      var render = Mustache.render(template, data);
      $(".container .search-results").html(render)
    });

    function getUrlParameter(name) {
      name = name.replace(/[\[]/, '\\[').replace(/[\]]/, '\\]');
      var regex = new RegExp('[\\?&]' + name + '=([^&#]*)');
      var results = regex.exec(location.search);
      return results === null ? '' : decodeURIComponent(results[1].replace(/\+/g, ' '));
    };
  })();
</script>
Now let’s create the search page. First, set up some parameters in the Hugo config.yml file. I added these two the params section on my file to store search settings details:
params:
  azureSearchApiKey: <snip>
  azureSearchInstance: accom-site
  azureSearchIndex: accom-live-index
  azureSearchResults: 25
Each of these values should be clear what to put for your instance. Mine match what you saw at the end of the previous section.
Next, create the search content page. I wanted my search results at http://www.andrewconnell.com/search, so I created the following file: ./content/search/_index.md. The only content in this file the title of the page in the front matter… yup, just 3 lines of code.
Now for the big part: the search results page’s template. This is where all the work happens.
Create a new file ./themes/{theme-name}/layouts/section/search.html.
There are three parts to this file:
- Hugo template to build the page header, footer & where the search results will go.
- Mustache template to render out the results.
- JavaScript to execute & render the search query with Mustache.
I’m using the simple templating library Mustache that comes in many flavors, including JavaScript. To solve that first step, I’ll set up the search page.
{{ partial "header.html" . }}

  <div class="container search-results">
    Executing search...
  </div>

<script src="https://cdnjs.cloudflare.com/ajax/libs/mustache.js/3.1.0/mustache.min.js"></script>
<script id="search-results-template" type="x-tmpl-mustache">
  [[#value]]
    <article class="blog-list-item">
      <header>
          <h2><a href="[[ url ]]">[[ title ]]</a></h2>
          <div class="meta">
            <div class="publish-date">
              <i class="text-primary far fa-clock"></i>
              [[ date_published_display ]]
            </div>
          </div>
      </header>
      <p>[[ description ]]</p>
      <a href="[[ url ]]" class="btn btn-primary text-light btn-more">
        Read More <i class="fas fa-caret-right"></i>
      </a>
    </article>
  [[/value]]
</script>
{{ partial "footer.html" . }}
This file adds the header & footer templates to build the page, then adds the container where the search results will go. The last part is pulling Mustache in from a CDN and creating a template for how I want each search result to be displayed. This template mostly matches how I list content on the homepage of the site.
At this point, I’ve implemented the first two parts of this file. The last part is the biggest.
Next, add the following JavaScript:
<script>
  (function(){
    Mustache.tags = [ '[[', ']]', ];
    var template = document.getElementById("search-results-template").innerHTML;
    Mustache.parse(template);

    var query = getUrlParameter('search');
    var azSearchInstance = '{{ .Site.Params.azureSearchInstance }}';
    var azSearchIndex = '{{ .Site.Params.azureSearchIndex }}';
    var azApiKey = '{{ .Site.Params.azureSearchApiKey }}';
    var azSearchResults = '{{ .Site.Params.azureSearchResults }}';
    var encodedQuery = encodeURIComponent(query);

    $.ajax({
      url: 'https://' + azSearchInstance + '.search.windows.net/indexes/'
          + azSearchIndex + '/docs?api-version=2019-05-06&$top=' + azSearchResults
          + '&api-key=' + azApiKey + '&search=' + encodedQuery,
      method: 'GET'
    }).done(function (data) {
      // display results
      var render = Mustache.render(template, data);
      $(".container .search-results").html(render)
    });

    function getUrlParameter(name) {
      name = name.replace(/[\[]/, '\\[').replace(/[\]]/, '\\]');
      var regex = new RegExp('[\\?&]' + name + '=([^&#]*)');
      var results = regex.exec(location.search);
      return results === null ? '' : decodeURIComponent(results[1].replace(/\+/g, ' '));
    };
  })();
</script>
This IIFE first configures Mustache to use a different style of delimiter tags as the default curly brackets conflict with the Go templating language used by Hugo. It then obtains and compiles the Mustache template listed above.
The next section sets some variables by collecting parameters from the query string for the search query to execute & from the Hugo config file.
The last step is to execute the search query. Here I’m using jQuery’s AJAX method to execute the query, taking the results and rendering them using the Mustache template. The rendered HTML is then added to the container I added above.
That’s it!
But that’s not all. I wanted to automate this deployment so each time the site was updated, it would be reindexed. I also wanted to monitor in my Azure Application Insights instance to see what search queries people are running & what elements they were clicking on. That’s what the next two posts will cover, so stay tuned!