Last week I wrote how I migrated my site from a dynamic CMS to a static site generated using Hugo. The site & all supporting processes are hosted in Microsoft Azure. In this post, I will explain how the site is automatically built and deployed when I either push new/updated content as well as on a scheduled basis. This is all implemented using Azure DevOps pipelines. In another post, Hosting Hugo on Azure, I detailed the topology of how the site is hosted and exposed to the world using Azure resources so I won’t be covering that here.
Before you dive in, a word of warning: this post is going to be very long & comprehensive. I’m documenting this for myself as my process stands today at launch as of August 2019. Let me first explain the high-level process so you can get a complete picture of the entire build & release flow.
TL;DR
The CI/CD process I’ve configured for the site is designed to be copy-paste in for anyone using Hugo and the set up that I’m using to host it. Specifically, storing the Hugo site & content in an Azure DevOps repo and hosting it using Azure Storage Blob support for static websites. Just do the following:
- Copy & paste in three YAML files that define the Azure DevOps pipeline: one main file & two templates for building & deploying
- Create a variable group with a set of three name-value pairs
- Optionally modify any parameters, but the defaults will likely be good enough for all
To recap, my set up includes two sites: a live site (https://www.andrewconnell.com) & a preview site (URL not shared) that includes all draft & content to be published in the future & excludes all content that will expire.
Requirements
So what does my pipeline do? My requirements are as follows:
- Build & deploy both sites immediately when updating to the master branch
- Build & deploy only the preview site immediately when updating any branch: This allows me to share or preview the site live for any new features or content I’m working on.
- Build & deploy only the master branch on a regular schedule Monday-Friday: I like to write a bunch of blog posts at once and publish them over time so I use Hugo’s
publishDatefront matter capability. Because Hugo is static, only content that has nopublishDateset or where thepublishDateis before the build time will be included. Therefore, I rebuild and deploy the site periodically throughout the day to give me that CMS-like publish schedule.
These requirements are fulfilled using Azure DevOps Pipelines. It is implemented entirely in YAML with three variables set in a DevOps variable group that define the target site’s URL & credentials to the Azure Storage Blob where the files are stored.
Azure DevOps Pipelines Overview
If you’re familiar with Azure DevOps you might want to skip this section.
Azure DevOps Pipelines are broken down in multiple stages. Typically stages flow sequentially but support branching out and having one stage depend on other stages and even depend on no previous stages at all.
Early on, Azure DevOps supported builds & releases. You could define builds using the browser-based tools or YAML. Releases were typically created and managed through the browser-based tools & could contain multiple stages. In the more modern pipelines, you can define any number of stages how you see it and define them entirely in YAML.
For my set up, I have two stages: build & deploy. The build stage is ultimately responsible for creating the files for the site. These are generated using the Hugo executable on Linux, MacOS or Windows. While I use Linux for my builds nothing is specific to Linux and with very little work, you can switch it over to MacOS or Windows if you like. The deploy stage takes the files from the build stage and uploads all added/updated files to the Azure Storage Blob as well as deletes any files no longer needed.
Pipelines can get complicated quickly. To simplify things, they support templates for both jobs and steps. In my configuration, I have a template for the build job and a template for the deploy job. Each accepts a number of parameters for configuration.
Azure DevOps Pipeline for Building & Deploying Hugo Sites
The pipeline is implemented with the file azure-pipelines.yml in the root of the project. The top of this file contains the rules that tell Azure DevOps when the pipeline should run:
trigger:
  branches:
    include:
      - '*'
schedules:
- cron: "3 12,15,17,22 * * Mon-Fri"
  displayName: Daily build of live site
  branches:
    include:
    - master
  always: true
variables:
  - group: accom sites
There are a few things to note here:
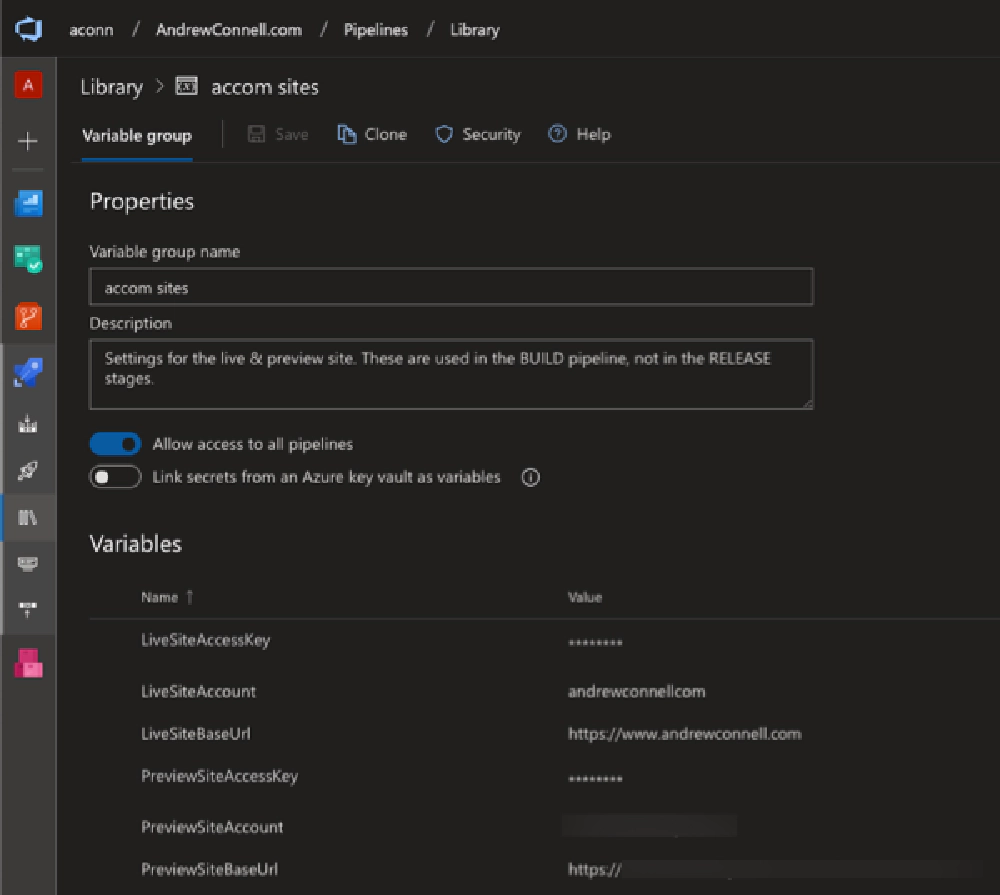
trigger: This section says “always run the pipeline when there’s a push to any branch”. I control the specific rules of which site should be built within the jobs themselves.schedules: This section tells Azure DevOps to run a build on the master branch at 8:03a, 11:03a, 1:03p & 6:03p ET (the times listed in the cron job are UTC… I’m -0400 or -0500 depending on the time of year) Monday-Friday. Thealways: truesays “always run this build, even when the source code hasn’t changed.” This ensures any posts that should be published simply because the time of the build is passed thepublishDateof the content will show up on the site.variables: This section defines the name of the variable group I’ve created in my DevOps account as you can see here:

Azure DevOps Pipeline Library properties
Now, let’s look at the build stage.
DevOps Stage 1: Building Hugo Sites
We’ll start with the build stage. This is defined in the build job template, saved in my project as ./build/site-build-job.yml:
# Azure DevOps Build Pipeline
#
# This job template is used in the build stage. It does the following:
# 1. Downloads specified version of Hugo executable
# 2. Installs Hugo executable
# 3. Executes Hugo to build site with specified arguments
# 4. Executes Hugo `deploy` command to log all files that would be
#    added/updated/deleted to the Azure site
# 5. Copy all relevant built files => staging folder (workaround for archiving)
# 6. Archive (e.g. zip) all built files
# 7. Publish Hugo installer for later stages
# 8. Publish built site codebase for later stages

parameters:
  # unique name of the job
  name: ''
  # friendly name of the job
  displayName: ''
  # condition when the job should run
  condition: {}
  # Hugo version to use in stage; e.g. #.#.# (do not include 'v' prefix)
  hugo_version: ''
  # Hugo value for argument --baseUrl
  hugo_config_baseUrl: ''
  # Hugo argument flags to include
  hugo_config_flags: ''
  # Azure Storage Account name & access key where site is deployed
  site_storage_account: ''
  site_storage_key: ''
  # Unique tag for site type
  build_tag: ''

jobs:
- job: ${{ parameters.name }}
  displayName: ${{ parameters.displayName }}
  pool:
    vmImage: ubuntu-latest
  condition: ${{ parameters.condition }}
  steps:
    # 1. Downloads specified version of Hugo executable
    - script: wget https://github.com/gohugoio/hugo/releases/download/v${{ parameters.hugo_version }}
        /hugo_${{ parameters.hugo_version }}_Linux-64bit.deb
        -O '$(Pipeline.Workspace)/hugo_${{ parameters.hugo_version }}_Linux-64bit.deb'
      displayName: Download Hugo v${{ parameters.hugo_version }} Linux x64
    # 2. Installs Hugo executable
    - script: sudo dpkg -i $(Pipeline.Workspace)/hugo*.deb
      displayName: Install Hugo
    # 3. Executes Hugo to build site with specified arguments
    - script: hugo --baseUrl '${{ parameters.hugo_config_baseUrl }}' ${{ parameters.hugo_config_flags }}
      displayName: Build site with Hugo (include future & expired content)
    # 4. Executes Hugo `deploy` command to log all files that would be
    #    added/updated/deleted to the Azure site
    - script: hugo deploy --maxDeletes -1 --dryRun
      displayName: Log files added/updated/deleted in site build
      env:
        AZURE_STORAGE_ACCOUNT: ${{ parameters.site_storage_account }}
        AZURE_STORAGE_KEY: ${{ parameters.site_storage_key }}
    # 5. Copy all relevant built files => staging folder (workaround for archiving)
    - task: CopyFiles@2
      displayName: Copy Hugo built site files to staging folder "deploy"
      inputs:
        Contents: |
          config.yml
          public/**
          resources/**
          static/**
          themes/**
        TargetFolder: deploy
    # 6. Archive (e.g. zip) all built files
    - task: ArchiveFiles@2
      displayName: Archive built site files
      inputs:
        rootFolderOrFile: ./deploy
        includeRootFolder: false
        archiveType: zip
        archiveFile: $(Pipeline.Workspace)/hugo-build.zip
        replaceExistingArchive: true
    # 7. Publish Hugo installer for later stages
    - publish: $(Pipeline.Workspace)/hugo_${{ parameters.hugo_version }}_Linux-64bit.deb
      artifact: hugo-installer
    # 8. Publish built site codebase for later stages
    - publish: $(Pipeline.Workspace)/hugo-build.zip
      artifact: build-${{ parameters.build_tag }}
The job well documented with comments as you can see in the snippet above, but I’ll explain each step in more detail in a moment. Before we do that, let’s jump back to the azure-pipelines.yml file and see how this job is run for my live site:
stages:
# build stage: build site codebase to use for deployment
- stage: Build_Codebase
  jobs:
    - template: build/site-build-job.yml
      parameters:
        name: build_live_site
        displayName: Live site (exclude drafts & future published content)
        # always build on pushes to master
        condition: and(succeeded(), eq(variables['Build.SourceBranch'], 'refs/heads/master'))
        hugo_version: 0.57.2
        hugo_config_baseUrl: $(LiveSiteBaseUrl)
        hugo_config_flags: '--minify'
        site_storage_account: $(LiveSiteAccount)
        site_storage_key: $(LiveSiteAccessKey)
        build_tag: live-site
Here you see where I’m referencing the job template above and passing in some parameters. A few things to call out:
condition: This ensures this job is only built when the master branch is the trigger for the build.hugo_*: These parameters define values that will be added to the Hugo executable when it’s run on the command line.site_storage_*: These ultimate will set the values of two environment variables,AZURE_STORAGE_ACCOUNT&AZURE_STORAGE_KEY, set when I run the hugo deploy command. I explain how this works later when we look at the specific steps in detail.
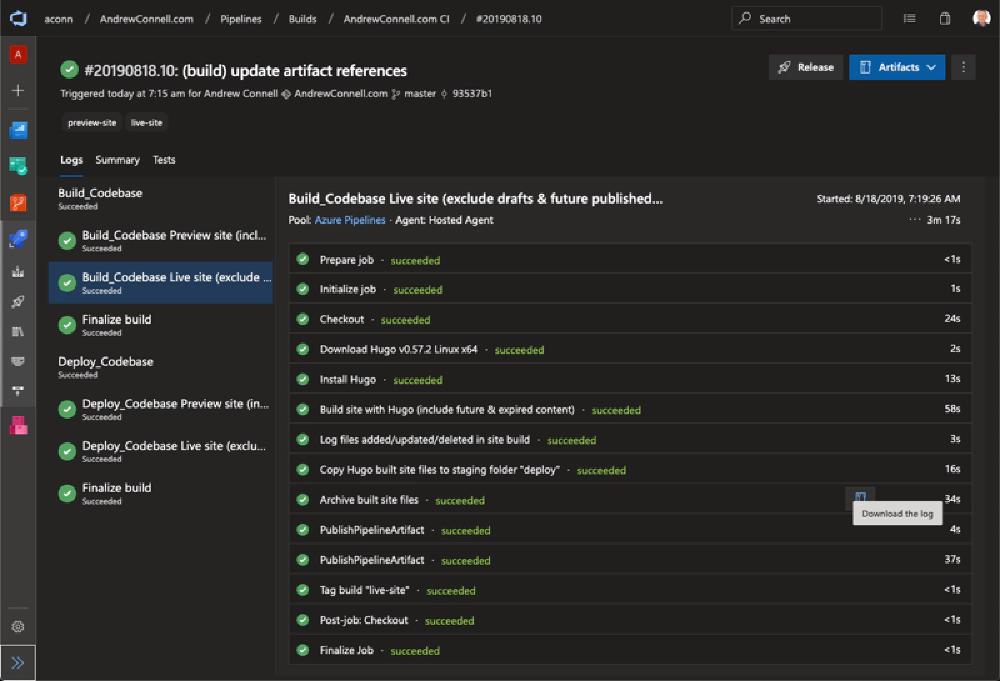
Here’s what the build log looks like when it runs. I’m only covering the live site in the detailed explanation, but here you can see the preview builds as well.

Azure DevOps Build Log Results
Let’s jump back to the job template file, ./build/site-build-job.yml, & spend look at the actual steps in detail. However, if all this makes sense to you so far, you may want to jump down to the section DevOps Stage 2: Deploying Hugo Sites.
The first part of the template worth noting is the pool/vmImage: ubuntu-latest. This is where I’m telling DevOps to run the build on the latest supported version of the Ubuntu (Linux).
Build Step 1: Download & Install Hugo
The first step is to download the desired Hugo version & install it:
# 1. Downloads specified version of Hugo executable
- script: wget https://github.com/gohugoio/hugo/releases/download/v${{ parameters.hugo_version }}
    /hugo_${{ parameters.hugo_version }}_Linux-64bit.deb
    -O '$(Pipeline.Workspace)/hugo_${{ parameters.hugo_version }}_Linux-64bit.deb'
  displayName: Download Hugo v${{ parameters.hugo_version }} Linux x64
# 2. Installs Hugo executable
- script: sudo dpkg -i $(Pipeline.Workspace)/hugo*.deb
  displayName: Install Hugo
I’m pulling a specific version from the list of releases the Hugo team publishes with each release on Github.
Build Step 2: Build the site Using the Hugo Executable
With Hugo installed, build the site. DevOps will have already cloned the repo.
# 3. Executes Hugo to build site with specified arguments
- script: hugo --baseUrl '${{ parameters.hugo_config_baseUrl }}' ${{ parameters.hugo_config_flags }}
  displayName: Build site with Hugo (include future & expired content)
Notice I’m using the parameters passed into the job to control some arguments on the hugo executable.
Yes, I’m aware of it, but there are a few things I didn’t like about it. That task allows you to pass a few input parameters in and it handles downloading & installing the Hugo installer. However, it only works on Windows. I don’t have anything against using Windows, I just prefer to do my builds on Linux.
If you want to use it, go for it. It would replace my download, install & build tasks. You can use the results from the build with the deploy command I use in the next step & in the deploy stage.
Build Step 3: Log all Files to be Uploaded & Deleted
This step isn’t necessary here as it’s really only needed in the deploy stage, but I like to run it just to get the information in this pipeline’s execution log.
# 4. Executes Hugo `deploy` command to log all files that would be
#    added/updated/deleted to the Azure site
- script: hugo deploy --maxDeletes -1 --dryRun
  displayName: Log files added/updated/deleted in site build
  env:
    AZURE_STORAGE_ACCOUNT: ${{ parameters.site_storage_account }}
    AZURE_STORAGE_KEY: ${{ parameters.site_storage_key }}
This is using the relatively new deploy command Hugo introduced. The argument --dryRun tells Hugo to just log what it will do, but don’t upload them. This command is for those who are hosting their site in one of the three big cloud providers: Google Cloud Platform, AWS or Azure. Within my site’s config.yml file, I have added the following entry:
deployment:
  targets:
    - name: "azure accom"
      url: "azblob://$web"
The name isn’t important. The deploy command will use this deployment (as it’s the only one listed) to learn “this is an Azure Storage Blob” and “the files go in the $web container”. It will sign in to Azure using the values within the AZURE_STORAGE_ACCOUNT & AZURE_STORAGE_KEY environment variables I set in the task above.
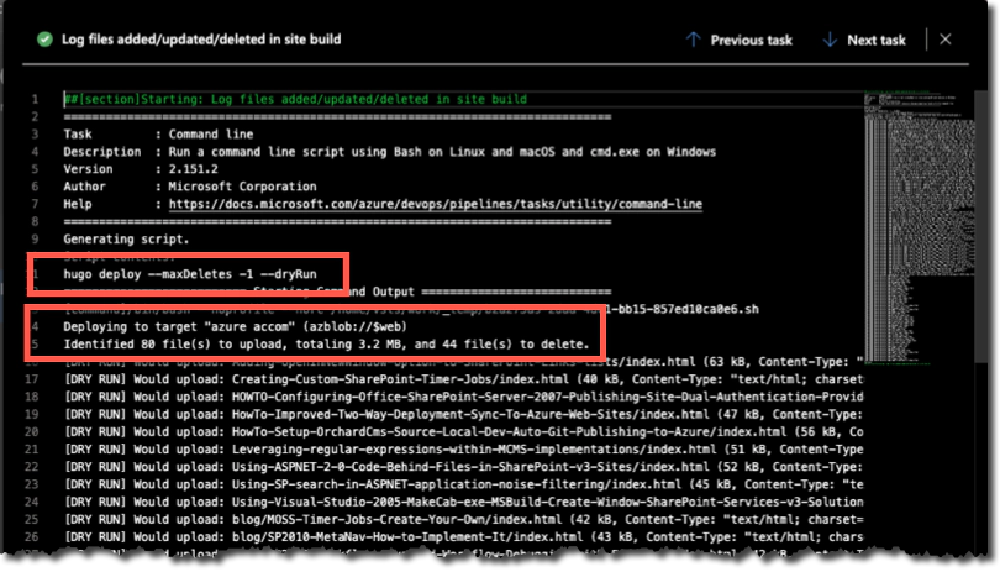
Here’s what the output of the command looks like… much better than using the DevOps Azure File Copy task to upload over a GB of files!

Azure DevOps Deploy Log Results
Build Step 4: Zip all Site Files (with a hack)
With the site built, we have everything we need so it’s time to publish build artifacts so other stages, like the deploy stage, can use it. Hugo builds the site in the folder ./public.
At first I was publishing this entire folder as an artifact, but I saw that take nearly 20 minutes. Why? My site consists of over 6,000 HTML files + all the referenced media. I think the quantity of files was slowing things down. I had the exact same problem over on the deploy stage when it was pulling the archive down. Factor in two sites and I was looking at a 60+ minute build+deploy on every push. Nope… got to do something about that…
So I tried zipping only the necessary stuff up, then publishing the resulting ZIP. While the zipped file is nearly 1GB, the resulting ZIP+copy time is roughly 50 seconds. Yeah, that will do!
# 5. Copy all relevant built files => staging folder (workaround for archiving)
- task: CopyFiles@2
  displayName: Copy Hugo built site files to staging folder "deploy"
  inputs:
    Contents: |
      config.yml
      public/**
      resources/**
      static/**
      themes/**
    TargetFolder: deploy
# 6. Archive (e.g. zip) all built files
- task: ArchiveFiles@2
  displayName: Archive built site files
  inputs:
    rootFolderOrFile: ./deploy
    includeRootFolder: false
    archiveType: zip
    archiveFile: $(Pipeline.Workspace)/hugo-build.zip
    replaceExistingArchive: true
Build Step 5: Publish Build Artifacts for other Stages
The last step is to publish the artifacts for future stages, like the deploy stage:
# 7. Publish Hugo installer for later stages
- publish: $(Pipeline.Workspace)/hugo_${{ parameters.hugo_version }}_Linux-64bit.deb
  artifact: hugo-installer
# 8. Publish built site codebase for later stages
- publish: $(Pipeline.Workspace)/hugo-build.zip
  artifact: build-${{ parameters.build_tag }}
Here you see I’m publishing the Hugo installer (no sense in downloading it from GitHub again) and the site files ZIP created in the previous step.
DevOps Stage 2: Deploying Hugo Sites
Now that the build stage is done, let’s at the deploy phase. This is defined in the deploy job template, saved in my project as ./build/site-deploy-job.yml:
# Azure DevOps Build Pipeline
#
# This job template is used in the deploy stage. It does the following:
# 1. Downloads Hugo executable from published artifacts
# 2. Downloads built site codebase from published artifacts
# 3. Installs Hugo executable
# 4. Extracts the zip'd site codebase
# 5. Executes Hugo `deploy` command to publish all files to Azure Storage blob

parameters:
  # unique name of the job
  name: ''
  # friendly name of the job
  displayName: ''
  # condition when the job should run
  condition: {}
  # Azure Storage Account name & access key where site is deployed
  site_storage_account: ''
  site_storage_key: ''
  # Unique tag for site type
  build_tag: ''

jobs:
- job: ${{ parameters.name }}
  displayName: ${{ parameters.displayName }}
  pool:
    vmImage: ubuntu-latest
  condition: ${{ parameters.condition }}
  steps:
  # 1. Downloads Hugo executable from published artifacts
  - download: current
    artifact: hugo-installer
  # 2. Downloads built site codebase from published artifacts
  - download: current
    artifact: build-${{ parameters.build_tag }}
  # 3. Installs Hugo executable
  - script: 'sudo dpkg -i hugo*.deb'
    workingDirectory: '$(Pipeline.Workspace)/hugo-installer'
    displayName: 'Install Hugo'
  # 4. Extracts the zip'd site codebase
  - task: ExtractFiles@1
    displayName: 'Extract files '
    inputs:
      archiveFilePatterns: '$(Pipeline.Workspace)/build-${{ parameters.build_tag }}/hugo-build.zip'
      destinationFolder: '$(Pipeline.Workspace)/build-${{ parameters.build_tag }}/deploy'
      cleanDestinationFolder: false
  # 5. Executes Hugo `deploy` command to publish all files to Azure Storage blob
  - script: 'hugo deploy --maxDeletes -1'
    workingDirectory: '$(Pipeline.Workspace)/build-${{ parameters.build_tag }}/deploy'
    displayName: 'Deploy build to site'
    env:
      AZURE_STORAGE_ACCOUNT: ${{ parameters.site_storage_account }}
      AZURE_STORAGE_KEY: ${{ parameters.site_storage_key }}
The job well documented with comments as you can see in the snippet above, but I’ll explain each step in more detail in a moment. Before we do that, let’s jump back to the azure-pipelines.yml file and see how this job is run for my live site:
- stage: Deploy_Codebase
  dependsOn: Build_Codebase
  jobs:
    - template: build/site-deploy-job.yml
      parameters:
        name: deploy_live_site
        displayName: Live site (exclude drafts & future published content)
        # always deploy on pushes to master
        condition: and(succeeded(), eq(variables['Build.SourceBranch'], 'refs/heads/master'))
        site_storage_account: $(LiveSiteAccount)
        site_storage_key: $(LiveSiteAccessKey)
        build_tag: live-site
Nothing special to call out here as there are even less parameters than in the build stage.
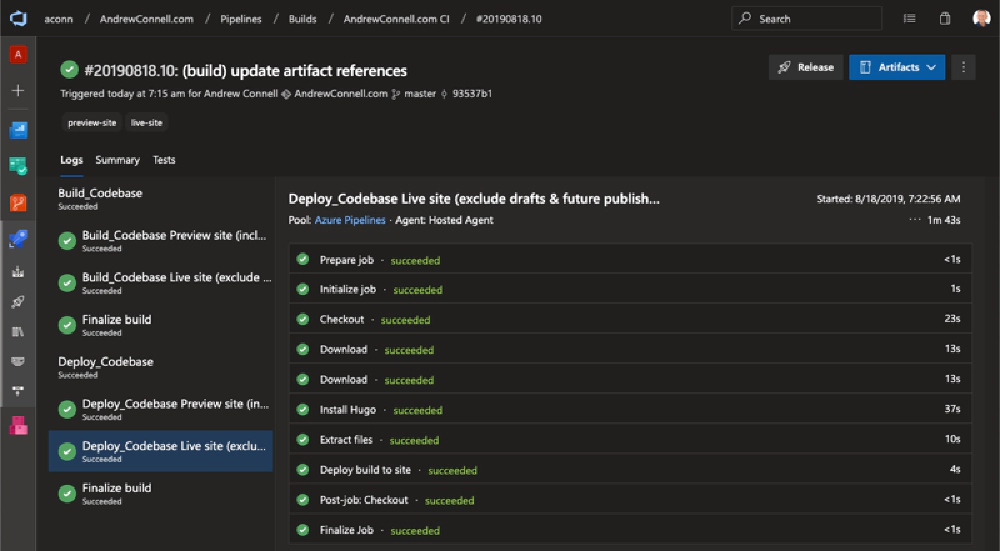
Here’s what the deploy log looks like when it runs. I’m only covering the live site in the detailed explanation, but here you can see the preview deploy as well.

Azure DevOps Deploy Log Results
Let’s jump back to the job template file, ./build/site-deploy-job.yml, & spend look at the actual steps in detail.
Deploy Step 1: Download Build Artifacts
We first need to get the things that were acquired or created in the build stage, so let’s download those two things: the Hugo installer & built site files in a ZIP:
# 1. Downloads Hugo executable from published artifacts
- download: current
  artifact: hugo-installer
# 2. Downloads built site codebase from published artifacts
- download: current
  artifact: build-${{ parameters.build_tag }}
Deploy Step 2: Install Hugo
Next, install Hugo from the installer we just downloaded. Nothing different here from the build stage:
# 3. Installs Hugo executable
- script: 'sudo dpkg -i hugo*.deb'
  workingDirectory: '$(Pipeline.Workspace)/hugo-installer'
  displayName: 'Install Hugo'
Deploy Step 3: Extract Built Site Files (zip)
We zipped up the built files in the build stage, so we need to unpack everything in order to deploy them:
# 4. Extracts the zip'd site codebase
- task: ExtractFiles@1
  displayName: 'Extract files '
  inputs:
    archiveFilePatterns: '$(Pipeline.Workspace)/build-${{ parameters.build_tag }}/hugo-build.zip'
    destinationFolder: '$(Pipeline.Workspace)/build-${{ parameters.build_tag }}/deploy'
    cleanDestinationFolder: false
Deploy Step 4: Upload New/Changed & Delete Removed Files
As I explained above in the build stage, Hugo’s deploy command can deploy a Hugo site to a public cloud provider. The only difference here from the build stage is the omission of the --dryRun command:
# 5. Executes Hugo `deploy` command to publish all files to Azure Storage blob
- script: 'hugo deploy --maxDeletes -1'
  workingDirectory: '$(Pipeline.Workspace)/build-${{ parameters.build_tag }}/deploy'
  displayName: 'Deploy build to site'
  env:
    AZURE_STORAGE_ACCOUNT: ${{ parameters.site_storage_account }}
    AZURE_STORAGE_KEY: ${{ parameters.site_storage_key }}
Summary
That’s it!
I have some plans to improve this process by adding new functionality and making this process a bit easier, but for now, this works for now. Depending when you’re reading this, you might want to check the Hugo category as I may have already made some of these changes.