In my last post, Microsoft Entra ID & ASP.NET MVC - Understanding ADAL & OWIN, I talked a little about how the Microsoft Entra ID Authentication Library (aka: ADAL) relates to the Open Web Interface for .NET (aka: OWIN). In this post I am going to walk you through creating an ASP.NET MVC application that leverages these to offload the authentication support to Microsoft Entra ID for your web apps. This is the crux of how you must authenticate and obtain an OAuth 2.0 access token for use in the Office 365 APIs.
Furthermore, I’m going to take advantage of the protocol OpenID Connect which Microsoft Entra ID supports in preview mode today. This is going to give you the ability to enable single sign-on in your applications. OpenID Connect is an extension of OAuth 2.0 (which is an authorization protocol, aka AuthZ) in that it makes it also act as an authentication protocol (aka AuthN). It does this by returning an id token which can be used to authentication the user.
Before I dive into this, I have a fully working sample of what I’m working through in this post in GitHub. Check my project Microsoft Entra ID Authentication using ADAL & OWIN in an ASP.NET MVC project for use with the Office 365 APIs. Look at the README.md for information on how to get it working on your machine. Each step along the way (indicated by the headings in this post) reference the specific commit’s in the GitHub project
Create the ASP.NET MVC Project
The first step is obviously to create the project… I’m not going to hold your hand through this except to mention that when you get the part of the process where you can select the authentication type, make sure you set the site for No Authentication as you’ll manually implement this.
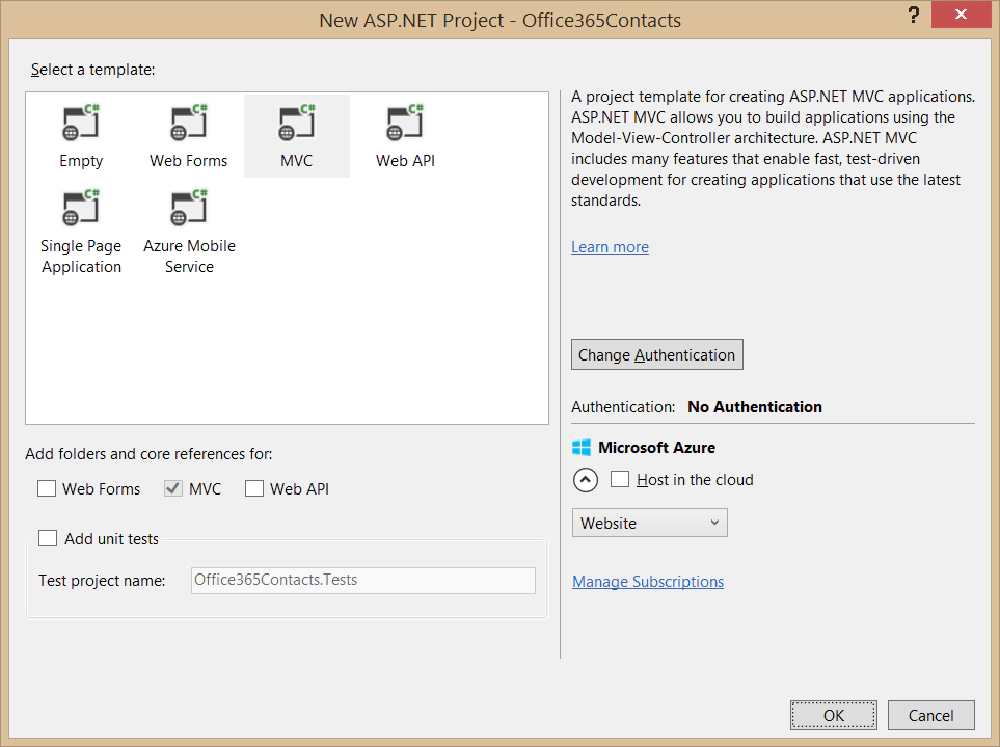
Microsoft Entra ID Authentication Walkthorugh
After doing that, the next thing I recommend you do is set up your site for SSL form the start. To do this, within the Properties window for the project, flip the SSL Enabled switch to True.
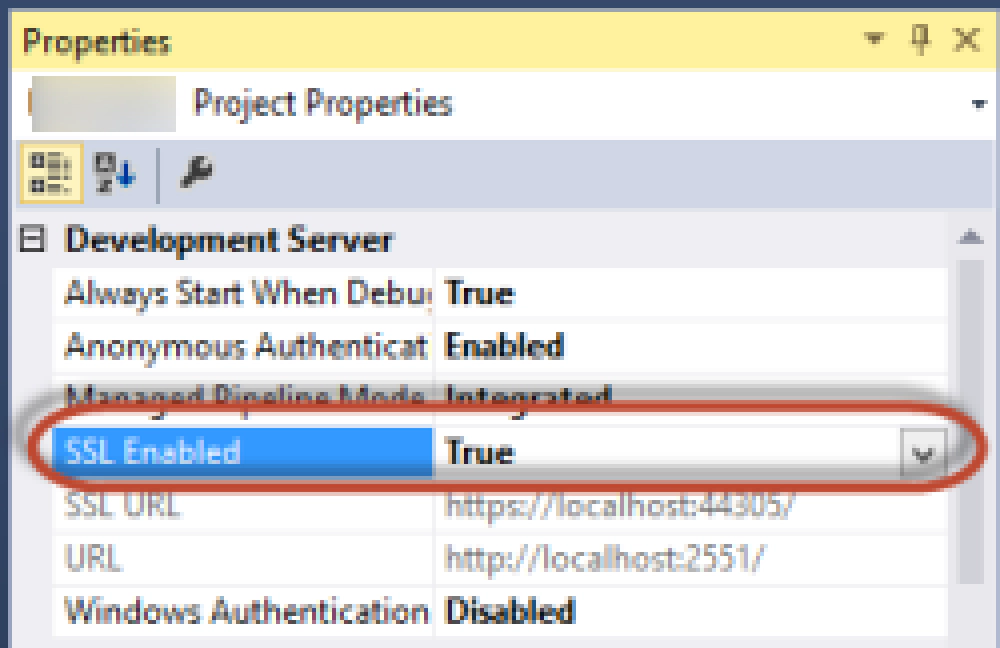
Microsoft Entra ID Authentication Walkthorugh
To make your life easier, let’s configure the project to always got to the homepage when debugging. Right-click the project in the Solution Explorer tool window and select Properties. Select the Web tab and find the Start Action. Select that radio button and plug the URL in for the SSL version of the site.
Add Connected Service for Office 365
The next step is to run through the Add Connected Service wizard in Visual Studio. While what I’m showing you in this walkthrough is not specific to Office 365, I’m using it in the demo. Today there is no Connected Service option for adding an Microsoft Entra ID application so we’re leveraging what the Office 365 Connected Service wizard does for us in creating an Microsoft Entra ID application.
If you don’t want to use the wizard, you can do this manually as I showed you in this blog post: Creating Microsoft Entra ID Apps for Office 365 Using the Azure Management Portal.
Right-click the project and select Add - Connected Service. After you sign in click the App Properties link. Take notice that there may be more than one Redirect URIs listed. If so, make sure you remove the http one as you only want the https one.
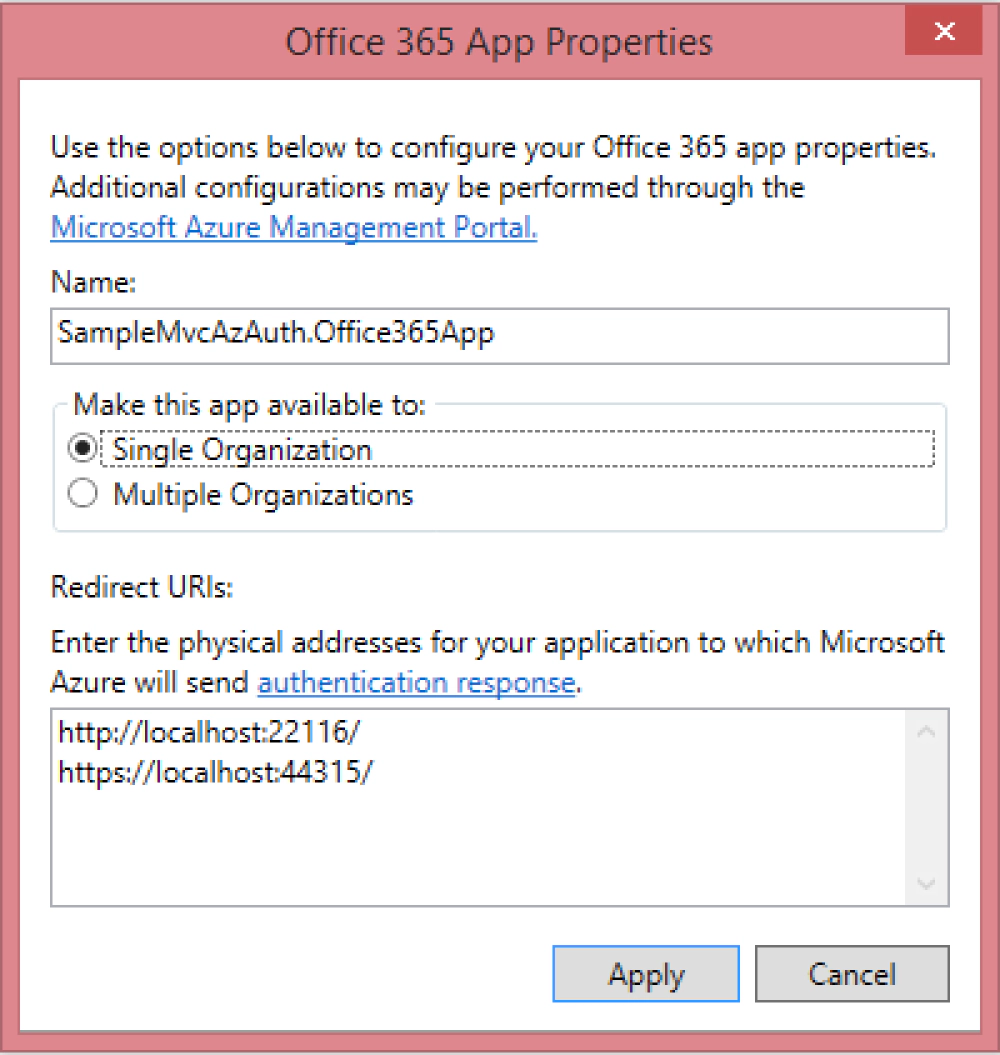
Microsoft Entra ID Authentication Walkthorugh
After making that change, go ahead and give you app additional permissions. Technically you only need to give it the Enable sign-in and read users’ profiles permission for the Users and Groups category. The screenshot below shows I also added Read permissions on the user’s Contacts.
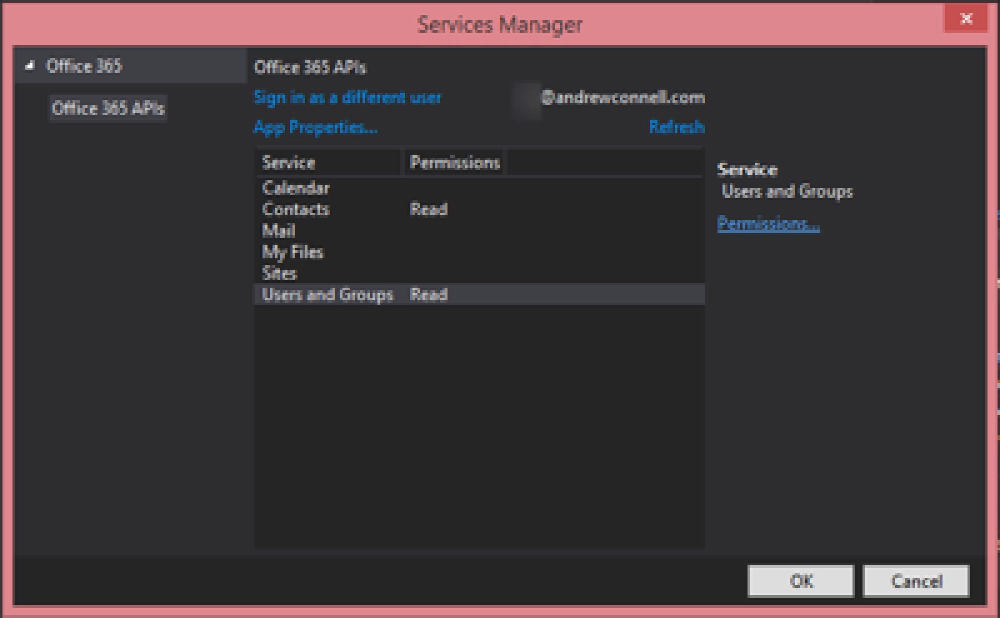
Microsoft Entra ID Authentication Walkthorugh
When you click OK in this wizard it will do the following things:
- Create an Microsoft Entra ID application with the specified permissions in your Microsoft Entra ID tenant
- Add two entries to the project’s web.config for the app’s ID (ida:ClientID) & the app’s secret (ida:Password)
- Add all the NuGet packages needed by Azure & Office 365 based on the permissions you selected
One last thing you need to do. Because I’m doing a single tenant app, I need to grab my Microsoft Entra ID tenant ID. To do this sign in to the Azure Managent Portal & go to your new app in the Microsoft Entra ID applications list. Select the Quick Start page for the in the top navigation… that’s the left-most menu item that looks like a lightning bolt in a cloud. On the Quick Start page, expand the Get Started - Enable Users to Sign On. Locate the field Federation Metadata Document URL. Within that field value you will see a GUID immediately after the sign in.windows.net part of the URL. Copy just the GUID value to the clipboard.
Now go into your project’s web.config and create a new app setting named ida:TenantId and paste that GUID in for the value of this setting.
Add Support for Caching Tokens
While you’re ready to start adding the code & packages you need to do the authentication, before we go there let’s set up a little extra stuff. When you sign in to an OAuth 2.0 service, you are basically asking for tokens to use in future requests. Once you get a token, you should be good… but you need to figure out a way to hold onto this token in your application so you don’t have to go through the authentication process for every request. So what you need is a way to cache the token. In a lot of the samples you see in the Microsoft Microsoft Entra ID Samples & Docs GitHub account, you’ll see they use something called the NaiveSessionCache.cs. This works in demos, but in production you should never use it because it isn’t very cloud friendly or scalable as the tokens are cached in the user’s session state.
A better option is to keep the tokens in some sort of persistent storage like a database. I give full credit to the Microsoft Entra ID doc team as I’m basing mine on the EFADALTokenCache.cs file they created.
First up, use NuGet to add Entity Framework to your project. We’ll use the code first model for creating the database schema. Next, add a new file to your Models folder in the project that will be used to store stuff in the database. Name the file PerUserWebCache.cs and add the following code to it:
Next, create a new folder Data and create a new file TokenCacheDataContext to hold the data context for the app, adding the following code to it.
For completeness, add the following database initializer to the Data folder:
After you do that, you’ll need to add a single line to the Global.asax.cs file to set the database initializer: Database.SetInitializer(new TokenCacheInitializer());
So now we’re set with a way to store tokens in persistent storage when we authenticate. Now we can move onto the authentication piece.
Add Necessary NuGet Packages for ADAL, OWIN & OpenID Connect
Before we can add the code to authenticate with Microsoft Entra ID, we need a few NuGet packages that will do the heavy lifting for us.
First add the NuGet package for ADAL: Microsoft.IdentityModel.Clients.ActiveDirectory.
Next, add the NuGet packages for OWIN that we’ll use:
And finally, add the NuGet package that we need to support OpenID Connect with OWIN: Microsoft.Owin.Security.OpenIdConnect.
Add ADAL, OWIN & OpenID Connect Code
Finally… we can now write some auth code!
Before I do this, I like to create a SettingsHelper.cs file in a new Utils folder to make it easier to work with the different hard coded & configuration strings I’ll use in my project for auth. Best part is this can be copied into every project as is.
Now, we need an implementation of the ADAL TokenCache class that we’ll use when we write the actual authentication code. Recall before I said that I like to base mine off the EFADALTokenCache.cs file the Microsoft Entra ID guys have created. The name they picked is a little odd to me, so I create my own file in the Utils folder named EfAdalTokenCache.cs and add the following code to it:
OK, NOW we can write the auth code! First, we need to plug into the OWIN startup process to register our authentication code that will leverage ADAL to authenticate with Microsoft Entra ID.
Add a new Startup.cs class to the root of your project with the following code in it. There three things to take note of from this file:
- The
assemblyattribute wires up ourStartupobject to theOwinStartupprocess… this way when OWIN starts up, it will call our class. - The
Startupclass we’re writing is a partial class that we’ll implement the other piece to in the next step. - There is a single method,
Configuration(IAppBuilder)that is expected by OWIN and will be called when OWIN starts up. It calls the yet-to-be-implementedConfigureAuth(IAppBuilder)method.
Now, go to the App_Start folder where all startup code should be. Add a new file named Startup.Auth.cs and add the following code to it. This is the other half of our Startup class and the implementation of the ConfigureAuth(IAppBuilder) method.
What this does is set up OpenID Connect authentication, passing in the id of our app (ClientId), the authority (our Microsoft Entra ID tenant) & then wires up to the response using the Notifications property. Here it leverages the token cache we created to start the authentication process.
At this point all the authentication code is written! But wouldn’t it be nice to make things a bit prettier for our end users? Yeah… I think so too…
Create a Login, Logout Process
Let’s make the authentication process a bit more real world by adding a sign in / logout process. For this, we need a user experience as well as a new MVC controller to handle it.
Start by creating a new MVC controller in the Controllers folder named AccountController and populate it with the following code. Notice it has handlers for sign-ing in, sign-ing out, obtaining consent from the user and a few other things:
Now, add a new partial view to the Views/Shared folder named _LoginPartial.cshtml that will contain the necessary controls:
And finally, add a single line to the _Layout.cshtml view to reference our new partial view. I did this right after the existing navigation links, specifically right after the unordered list: @Html.Partial("__LoginPartial")
Ladies and gents… that’s it!
Test it!
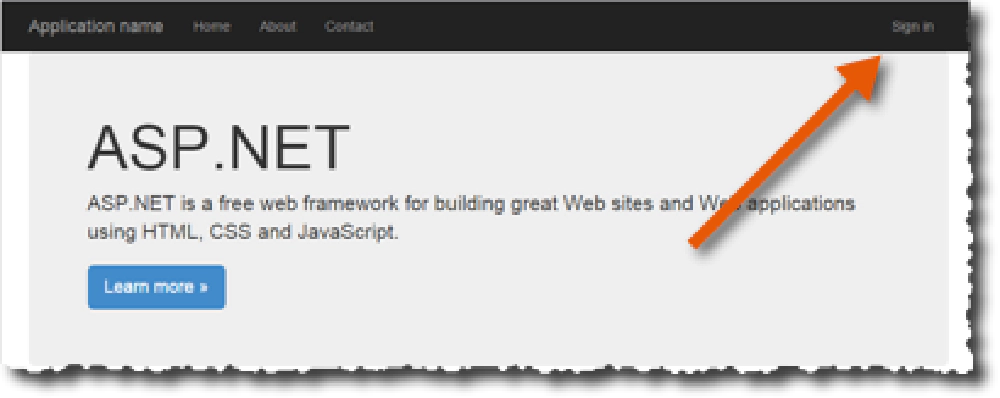
All that’s left is the screaming. Hit F5 to start debugging. You should be taken to the first page on the site, but not logged in as this figure shows (note the top-right Sign In link):
Microsoft Entra ID Authentication Walkthorugh
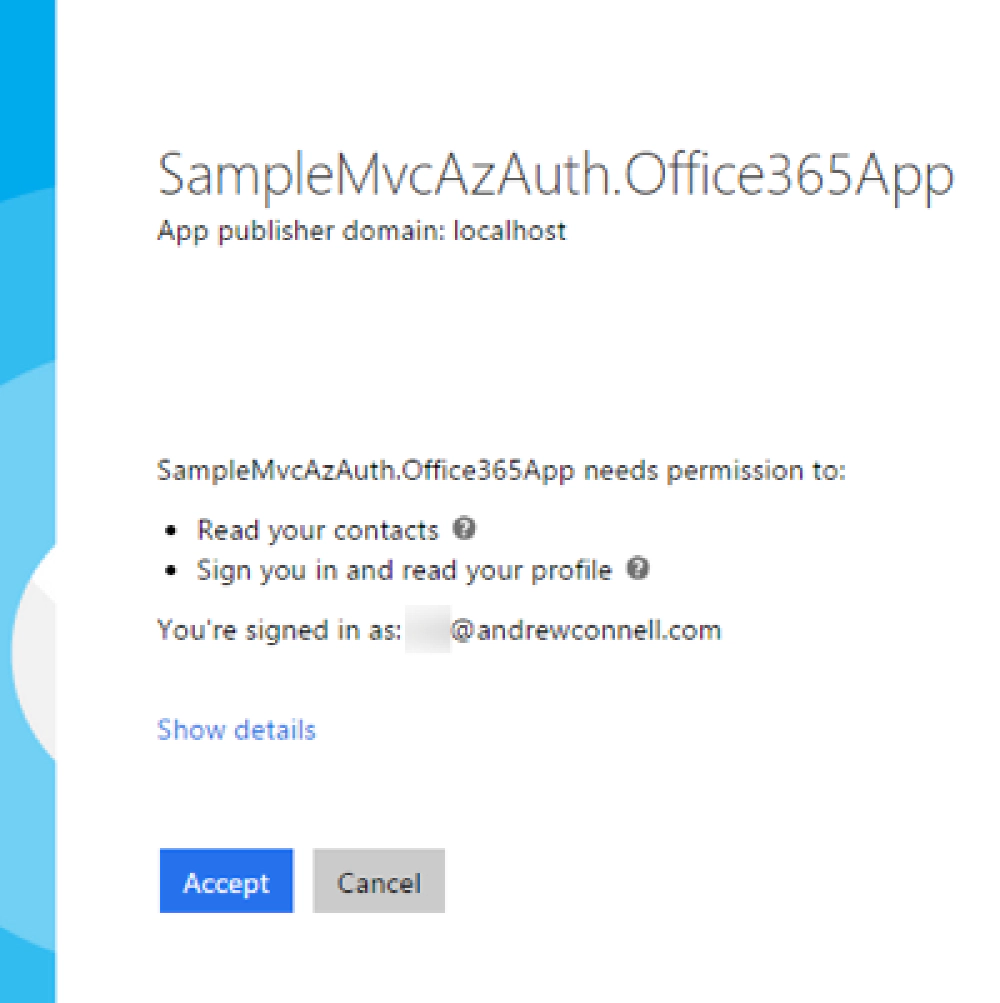
If you click that link, it will take you to Microsoft Entra ID to sign-in. Once you sign-in, you’ll be prompted to grant the app the necessary permissions it requested when you when through the Connected Service wizard:
Microsoft Entra ID Authentication Walkthorugh
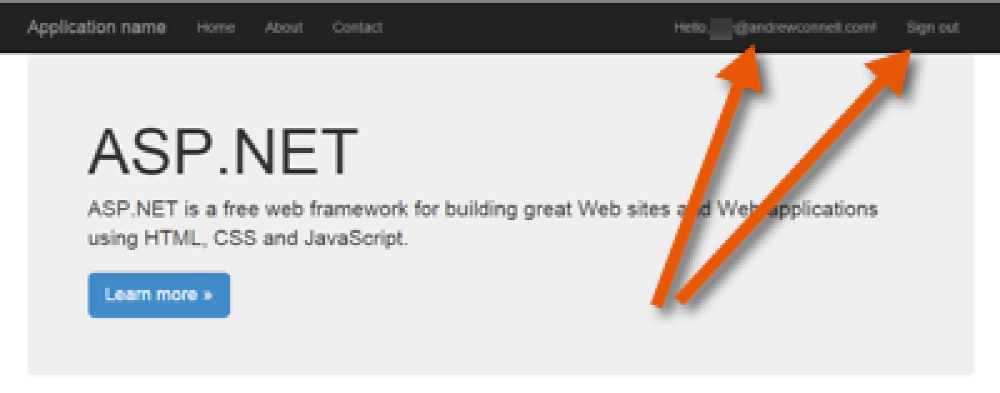
Once you do that, you’re taken back to your site. Notice now you are logged in and you can even see the sign-in ID of the user!
Microsoft Entra ID Authentication Walkthorugh
At this point you have a fully working ASP.NET MVC site that is using Microsoft Entra ID for authentication!