The SharePoint Framework enables developers to create custom forms in SharePoint lists so that when you click the new or edit button, you have control over the experience.
The project template that’s created by the Yeoman generator includes the necessary elements.xml file used in Features and the legacy XML provisioning when you install the SharePoint package… except list form customizers! Unfortunately it seems that Microsoft forgot that we need to register these with a SharePoint list! 😱
So, to register your list form customizer with a list, you’ll have to write some code and call the SharePoint REST API.
In this article, I’ll show you how to do register a form customizer using the SharePoint REST API and share a little utility I created that you can use to do the same thing without writing any code!
Explore the scenario
OK, before we get started, let’s define the problem before we look at the solution.
The SharePoint Framework list form customizer extension lets developers create custom rendering implementations for list forms in SharePoint lists. Conceptually these are very easy to understand. When you go to a SharePoint list and click the New button to create a new item, you want to display your custom form instead of using the default list form in SharePoint.
That’s what list form customizers enable you to do. Introduced in the SharePoint Framework v1.15 (learn more about the v1.15 release in my video & associated article ), when you define your custom form, instead of SharePoint showing its default list form, it takes you to a custom page that contains your form.
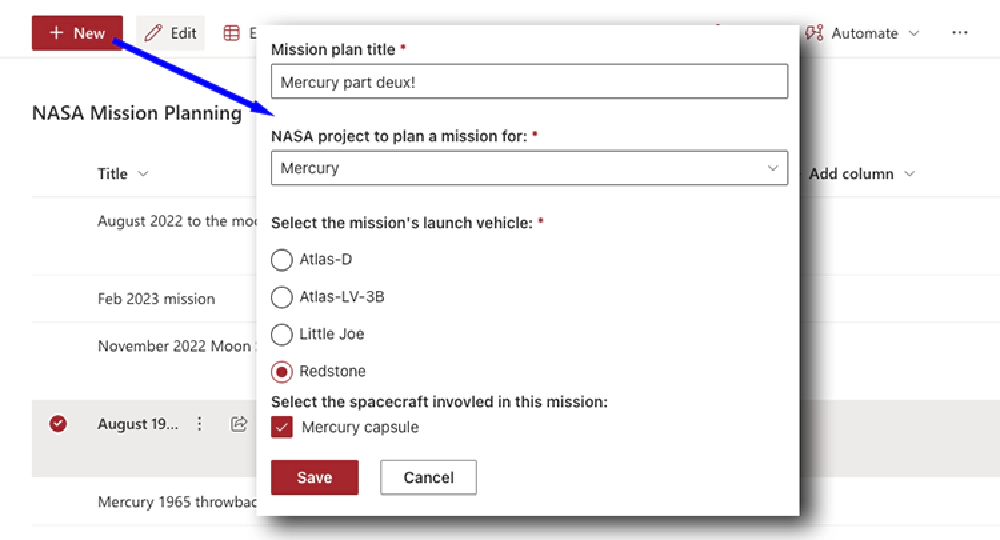
Working custom list form customizer (new form)
The advantage to this is that you have complete control over your form, but the flip side to them is that you have all the responsibilities of the form as well. For instance, you have to handle the retrieval of the list item’s data in the case of a display or edit for, as well as saving the data.
Custom list forms are actually tied to content types, not lists. Each list contains a collection of content types. Even if the list isn’t configured to allow content types, it has two default content types: Folder & Item. This means that when you set your custom list form on a content type, you can scope it to a specific list by only updating the content type in the list, or to an entire site collection by updating the content type in the site’s content type collection.
Like all extensions, there are two parts to getting this working in your SharePoint site.
- You first create the extension and install it in your SharePoint site, like any component.
- Then, you have to register the list form customizer extension with a content type. This is done using the SharePoint API. To demonstrate this, let me show you a little utility I created to show how this works.
My utility web part uses the SharePoint REST API to register, change, or deregister a list field customizer on an existing content type on a list. The source to this project is included in the student download of my course, Mastering the SharePoint Framework .
SPFx List Form Customizer Manager
Let’s register the installed list form customizer on our list with my utility web part.
I’ve already installed all the dependencies so I’ll just start the local web server with gulp serve.
Once that’s running, let’s use the utility on the hosted workbench for the site where our list exists. So, I’ll add my web part, the SPFx List Form Customizer Manager, to the workbench.
The way this works is that you first select a list in the current site, and then a content type from that list. If a content type in the list has a gear next to it, that indicates it has at least one custom form assigned to it.
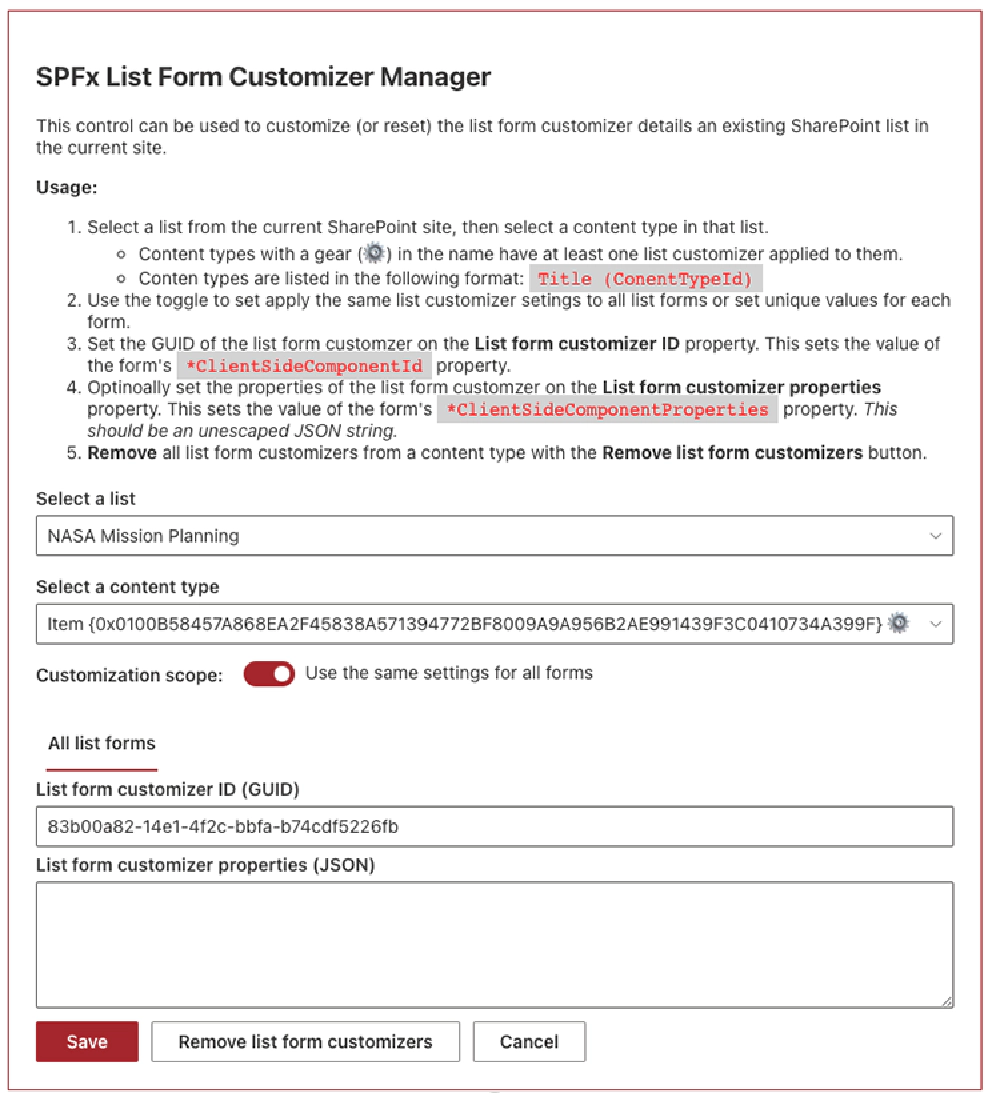
SPFx list form customizer manager web part
Once the content type is selected, set the GUID of the list form customizer that’s installed in the site on the List Form customizer ID property.
You can also optionally set custom properties on the registration if your extension expects them. In my case, I’ve created some properties to tell the extension which column in the list maps to the expected value for the NASA mission item. If I don’t set these, it adds the item to the Title field as a delimited string… so I’ll set them here.
Notice you can set the values for each form individually, or use the same one across all forms. This is useful if you have a different list form customizer created for each form. In my case, one customizer handles all three cases, so I’ll just set it once.
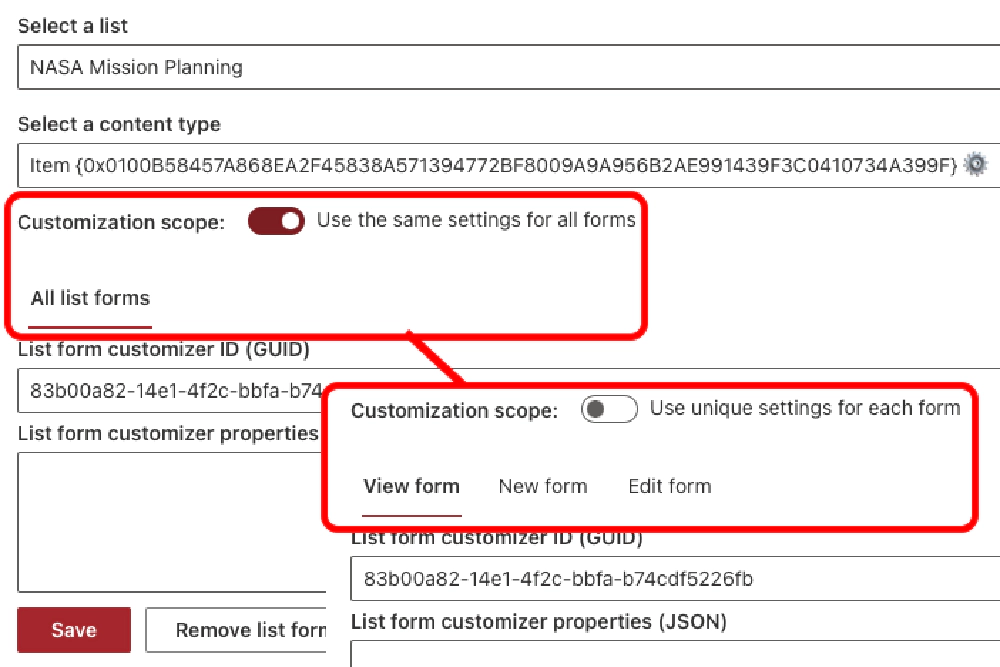
Options to apply form customization changes to all forms or specific form
Finally, I’ll click Save to save my changes.
This simple list form customizer is one of the demos in my course, Mastering the SharePoint Framework , linked in the description below. Students of my course have access to the complete source of this field customizer.
If you want a copy of my SPFx List Form Customizer Manager sample project, skip to the bottom of the article to download the project .
Let’s see if it worked by going back to the list and refreshing the page. Now, click the new button and we should be taken to our custom list!
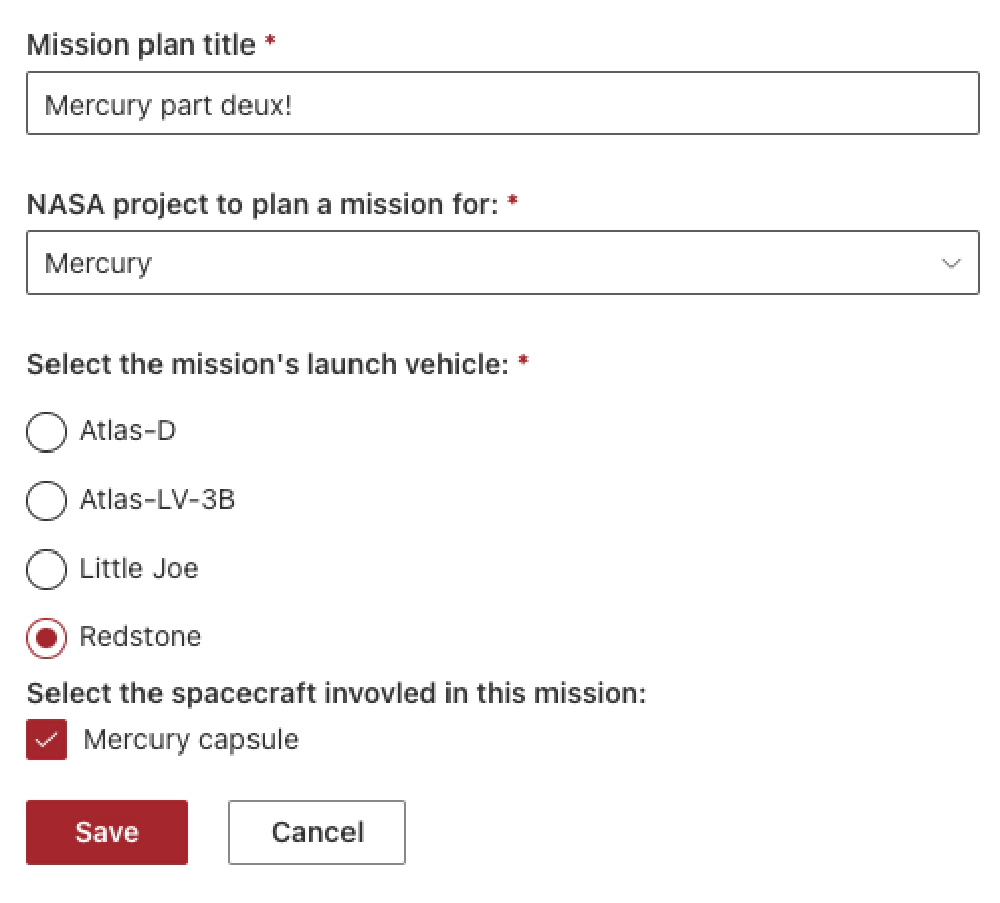
SP List Form Customizer - custom edit/new form
How does it work?
Now that you’ve seen the finished version, let’s see how this works. To keep it simple, I’ll use the browser’s NETWORK tab.
After getting the lists, I then got all the content types in the list:
public static async GetListContentTypes(listId: string): Promise<ISpListContentType[]> {
  const endpoint: string = `${SpSiteService._currentSiteUrl}/_api/web/lists(guid'${listId}')/contenttypes
    ?$select=Id,Name,DisplayFormClientSideComponentId,DisplayFormClientSideComponentProperties,EditFormClientSideComponentId,EditFormClientSideComponentProperties,NewFormClientSideComponentId,NewFormClientSideComponentProperties
    &$orderby=Name asc`;
  const responseRaw: SPHttpClientResponse = await SpSiteService._spHttpClient.get(endpoint, SPHttpClient.configurations.v1);

  return (await responseRaw.json()).value.map((column: ISpListContentType) => {
    return {
      Id: (column.Id as any).StringValue,
      Name: column.Name,
      DisplayFormClientSideComponentId: column.DisplayFormClientSideComponentId,
      DisplayFormClientSideComponentProperties: column.DisplayFormClientSideComponentProperties,
      EditFormClientSideComponentId: column.EditFormClientSideComponentId,
      EditFormClientSideComponentProperties: column.EditFormClientSideComponentProperties,
      NewFormClientSideComponentId: column.NewFormClientSideComponentId,
      NewFormClientSideComponentProperties: column.NewFormClientSideComponentProperties
    } as ISpListContentType
  });
}
Notice how when a column doesn’t have a content type doesn’t have custom forms set, the form’s ClientSideComponentId property is set to a bunch of zero’s to indicate an empty or null GUID:
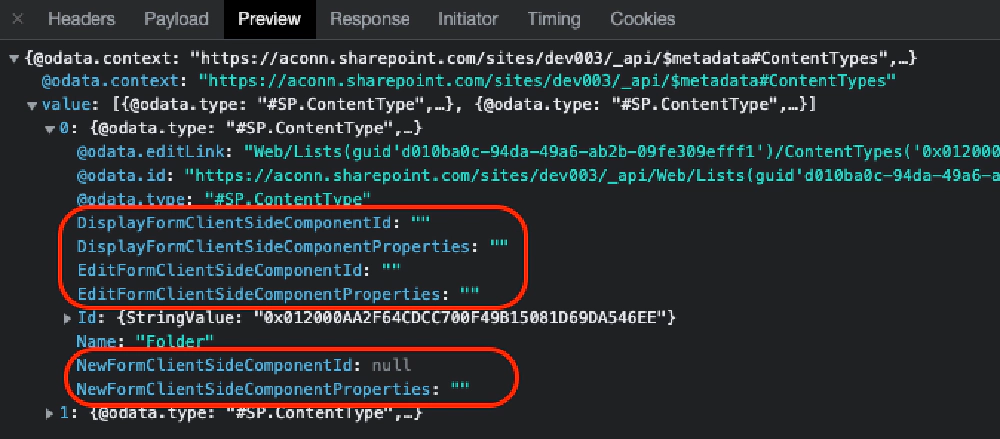
List forms without a customizer registered to them
This utility web part saves the GUID and component properties a serialized JSON string to two ClientSideComponentId & ClientSiteComponentProperties properties by submitting an HTTP POST to the column’s endpoint:
public static async UpdateListContentType(
  listId: string,
  contentTypeId: string,
  displayFormExtensionId: string,
  displayFormExtensionProperties: string,
  editFormExtensionId: string,
  editFormExtensionProperties: string,
  newFormExtensionId: string,
  newFormExtensionProperties: string
): Promise<void> {
  const endpoint: string = `${SpSiteService._currentSiteUrl}/_api/web/lists(guid'${listId}')/contenttypes('${contentTypeId}')`;

  const responseRaw: SPHttpClientResponse = await SpSiteService._spHttpClient.post(
    endpoint,
    SPHttpClient.configurations.v1,
    {
      headers: {
        'ACCEPT': 'application/json; odata.metadata=none',
        'CONTENT-TYPE': 'application/json',
        'X-HTTP-Method': 'MERGE'
      },
      body: JSON.stringify({
        DisplayFormClientSideComponentId: displayFormExtensionId,
        DisplayFormClientSideComponentProperties: displayFormExtensionProperties,
        EditFormClientSideComponentId: editFormExtensionId,
        EditFormClientSideComponentProperties: editFormExtensionProperties,
        NewFormClientSideComponentId: newFormExtensionId,
        NewFormClientSideComponentProperties: newFormExtensionProperties
      })
    }
  );

  if (responseRaw.status >= 200 && responseRaw.status < 300) {
    return;
  } else {
    const errorMessageDetail: string = (await responseRaw.json())?.error?.message || '';
    throw new Error(`Error updating content type: (${responseRaw.status}) ${errorMessageDetail}`);
  }
}
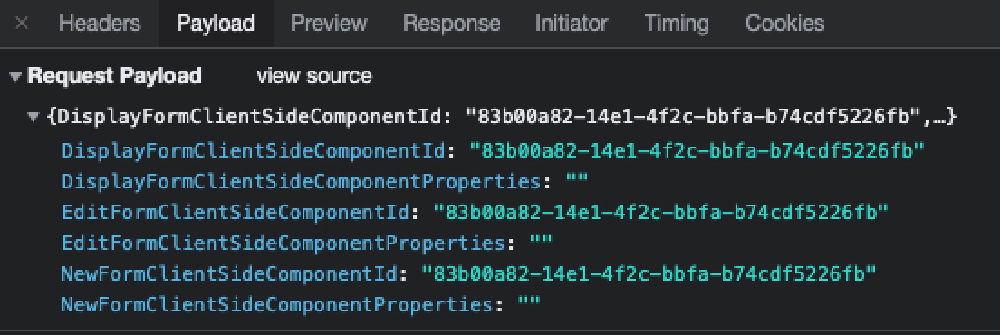
Saving the list form customizer component on the SharePoint list’s content type
Now when you get a list of all the content types using the SharePoint REST API, you can see the ClientSideComponentId is set to use our installed SPFx field customizer component.
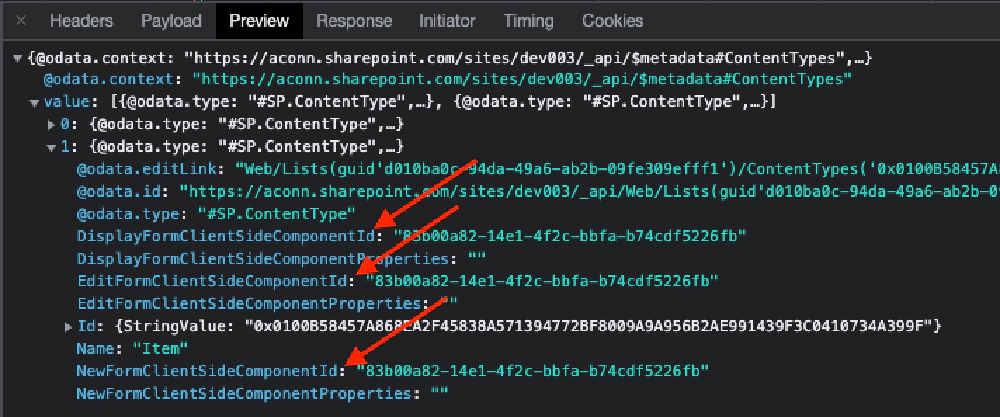
Wrapping it up
I much prefer this option using the REST API than using the XML provisioning other extension types use. It’s more flexible and it’s also not a black box like XML provisioning is in SharePoint. Sure… XML provisioning works when it works, but when it doesn’t, it’s a black hole and debugging nightmare! Doesn’t matter though in this case, as list form customizers don’t even support it!
If you want to see this in action, check out the video on our YouTube channel that shows the entire process:
What do you think about about using the REST API to register a list form customizer?
Let me know by tweeting me or commenting on the video above.
Get the code!
Students of my course have access to the source of the project to see how it works to implement it in their solutions. This project uses the Fluent UI Controls in a React-based web part created using React Hooks. All interaction with SharePoint happens through the REST API.
Get the code for my sample SPFx List Form Customizer Manager web part I used in this article & the associated video by filling out this form.