In a previous post I talked about the Different OAuth2 Flows Supported in Microsoft Entra ID for Office 365 APIs . That post outlined three different authentication flows. There’s the Authorization Code Grant Flow that I think is the most common in that when you sign in you get a code that can be used to obtain an access token. The Implicit Grant Flow* allows you to create fully client-side solutions with no back-end intermediary site.
The other flow I mentioned in that post is the Client Credentials Grant Flow, so let me explain it in this post.
Check out my Pluralsight course Office 365 APIs - Overview, Authentication and the Discovery Service , specifically modules 3 & 4, that go deep into the authentication process.
First, what is this? In this authentication flow, unlike the other two types, the app will sign in as itself & have it’s own permissions. It differs from the other two flows in that this one does not use delegated permissions. In both the simplicity & authorization code grant flows, the user logs in and delegates the app to act on the user’s behalf. Both the user & the app have permissions. The app’s permissions grant it the ability to do something, like access the user’s contacts where the user’s permissions grant the app the right to do something. In those two flows the app & user must both have the same permissions required by the specified action.
However what about the case when you want app only permissions and for it to act without involvement of the user. In this case you assign the Microsoft Entra ID app, application permissions. When would you want to use this option? If you are building a service or demon style application with zero user involvement this could come in quite handy.
Authentication - Establishing Identity with App Only
With the authorization code & implicit grant flows, the user logs in using their username (email) and password into Microsoft Entra ID’s authorization endpoint to establish their identity. But when there’s an app, how do you do it?
The establishment of the identity of the app is done using certificates. At a high level what you’ll do is create a public-private key pair and register the public key with your Microsoft Entra ID application. Today this is done manually by hand editing the application’s manifest file. Then your app will digitally sign a self-created JWT token with the private key and send it to the Microsoft Entra ID Access Endpoint. When Microsoft Entra ID gets the request for an access token for a specific app, it will see that you are using the client credentials grant flow and make sure the digital signature is valid with it’s copy of the public key.
How It Works
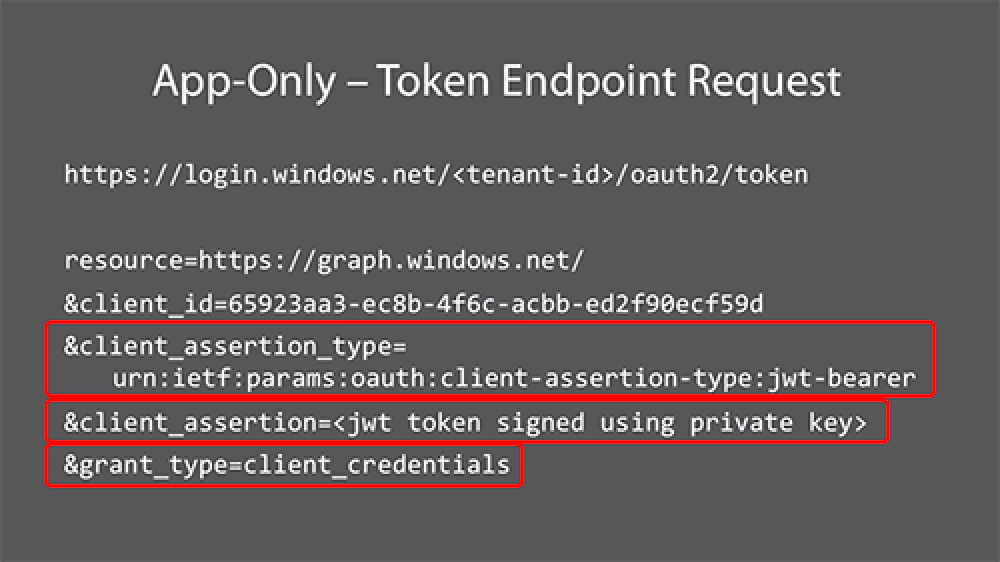
In previous posts I’ve shown you what the access token endpoint request looks like to get this working, so let me show you that here for this flow type:

App Only Permissions
Notice the three highlights. The last one, grant_type says you are using the client credentials OAuth2 flow. The client_assertion_type tells Microsoft Entra ID the type of assertion being passed in the request for an access token. This value will always be the same. The actual assertion in the client_assertion is the JWT token that your app created using the private key.
Creating the App
Let’s see how to set this up. First you’ll create the app in Microsoft Entra ID just like I’ve shown you in previous posts here and here .
Then you need to add the certificate to the registered application. You can use an official certificate from a trusted root authority, or you can create a self signed certificate. If you do the latter make sure you set the key length to 2048 as that’s the minimum length for the client credential flow. You can do this using the makecert.exe tool on Windows:
makecert -r -pe -n "CN=Contoso SuperApp Cert" -b 1/01/2015 -e 12/31/2016 -ss my -len 2048
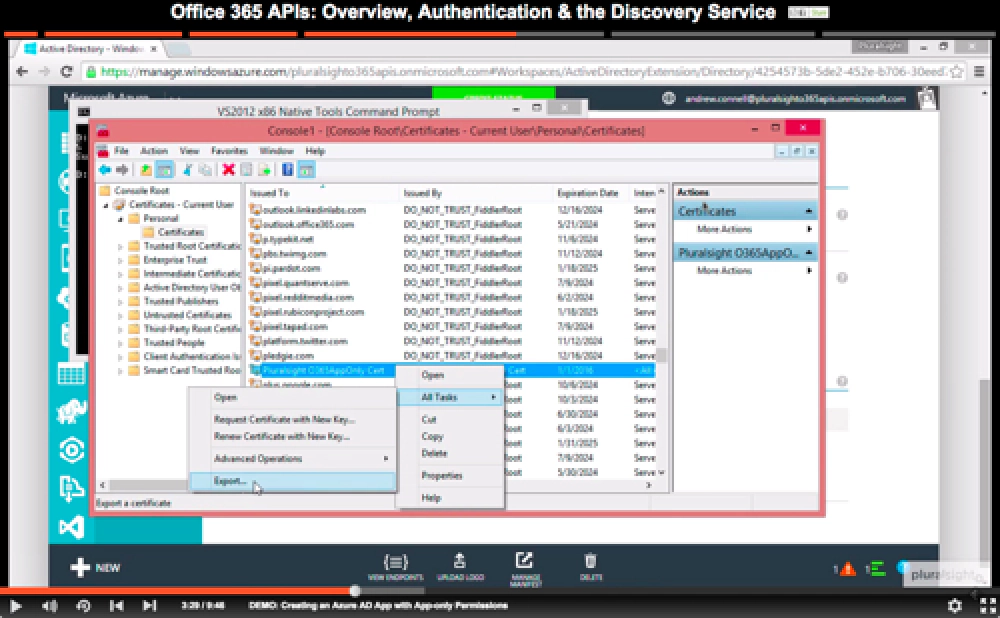
Now get the public version of the certificate by opening the Certificates MMC snap-in that’s connected to your user account. Find the cert you just created and export it as a base64 encoded CER file:

App Only Permissions
With that done, we need to extract a few values from the certificate. Use the following PowerShell to get the base 64 value & thumbprint of the certificate we just created and to create a new GUID as the unique ID for the certificate:
$cer = New-Object System.Security.Cryptography.X509Certificates.X509Certificate2
$cer.Import("mycer.cer")
$bin = $cer.GetRawCertData()
$base64Value = [System.Convert]::ToBase64String($bin)

$bin = $cer.GetCertHash()
$base64Thumbprint = [System.Convert]::ToBase64String($bin)

$keyid = [System.Guid]::NewGuid().ToString()
We can now finally register the certificate with the application. Within the Microsoft Entra ID portal, download the manifest for your app by clicking the Manage Manifest button in the gutter of the browser:

App Only Permissions
Open the downloaded JSON file in a text editor, locate the KeyCredentials section and replace it with the following, making sure to update the values from what you obtained using the PowerShell above:
"keyCredentials": [{
  "customKeyIdentifier": "$base64Thumbprint_from_POSH",
  "keyId": "$keyid_from_POSH",
  "type": "AsymmetricX509Cert",
  "usage": "Verify",
  "value": "$base64Value_from_POSH"
}]
That’s it! Now your app is ready. The last step is to write the code that will use this auth flow. Matthias Leibmann has a great sample app you can use to test this out on GitHub here: o365api-as-app-only … but if you’re looking for the code to get an access token, here it is:
string authority = appConfig.AuthorizationUri.Replace("common", tenantId);
AuthenticationContext authenticationContext = new AuthenticationContext(
authority,
false);

string certfile = Server.MapPath(appConfig.ClientCertificatePfx);

X509Certificate2 cert = new X509Certificate2(certfile,
// password for the cert file containing private key
appConfig.ClientCertificatePfxPassword,
X509KeyStorageFlags.MachineKeySet);

ClientAssertionCertificate cac = new ClientAssertionCertificate(
appConfig.ClientId, cert);

var authenticationResult = await authenticationContext.AcquireTokenAsync(
resource,
cac);

string accessToken = authenticationResult.AccessToken;
Confused? I show you how to do this in my course on Pluralsight Office 365 APIs - Overview, Authentication and the Discovery Service , specifically module 4 in the clip titled DEMO: Creating an Microsoft Entra ID App with App-only Permissions & DEMO: Exploring the HTTP Requests with App-only Permissions.
Be Careful - User’s Not Allowed; Admins Only
Unlike the other types of authentication flows where the user grants (and revokes) the app permission to touch it’s resources, with app-only permissions, the tenant administrator must be the one to grant / revoke access; user’s have no say in it.
Interested in learning more? Check out my course Pluralsight Office 365 APIs - Overview, Authentication and the Discovery Service , specifically module 4, that explains and demonstrates the authentication flow described in this post.
Also check Matthias Leibmann’s blog post Building Daemon or Service Apps with Office 365 Mail, Calendar & Contacts API (OAuth2 client credential flow on the Exchange Dev Blog as well as the interview with him on the Office 365 Developer Podcast (ep 36) .